[REAL Python – Flask] – “블로그 웹 애플리케이션 개발(3) – 댓글 CRUD, 게시물 삭제 처리, 간단한 contact form 구현하기”
[REAL Python – Flask] – “블로그 웹 애플리케이션 개발(3) – 댓글 CRUD, 게시물 삭제 처리, 간단한 contact form 구현하기”

게시물, 댓글에 관한 삭제 처리는 이 포스팅의 끝자락에서 다룹니다.
Superuser 생성 쉽게 하기
예전에는 “is_staff” 필드가 없었기 때문에 쉽게 회원가입을 진행한 후 우리가 원하는 테스트 (관리자 페이지, 글 작성 등) 을 수행할 수 있었지만, 이제는 그렇지 않죠. 회원가입을 한다면 is_staff 값은 기본값인 False로 저장됩니다. 이를 해결하기 위해서 스태프 권한을 가지고 있는 유저를 커맨드 라인을 이용해서 쉽게 만들 수 있도록 작업해 보겠습니다.
    # Custom Command Line
    import click
    from flask.cli import with_appcontext
    @click.command(name="create_superuser")
    @with_appcontext
    def create_superuser():

        # 정보 입력받기
        username = input("Enter username : ")
        email = input("Enter email : ")
        password = input("Enter password : ")
        is_staff = True

        try:
            superuser = get_user_model()(
                username = username,
                email = email,
                password = generate_password_hash(password),
                is_staff = is_staff
            )
            db.session.add(superuser)
            db.session.commit()
        except IntegrityError:
            print('\033[31m' + "Error : username or email already exists.")
        print(f"User created! : {email}")

    app.cli.add_command(create_superuser)
위의 코드를 __init__.py 의 return app 의 윗부분에 작성해 주세요. 그리고, 터미널에서 flask create_superuser 를 입력하면 쉽게 스태프 권한이 있는 사용자를 만들 수 있을 겁니다.

댓글 작성을 위한 HTML Form 작성하기
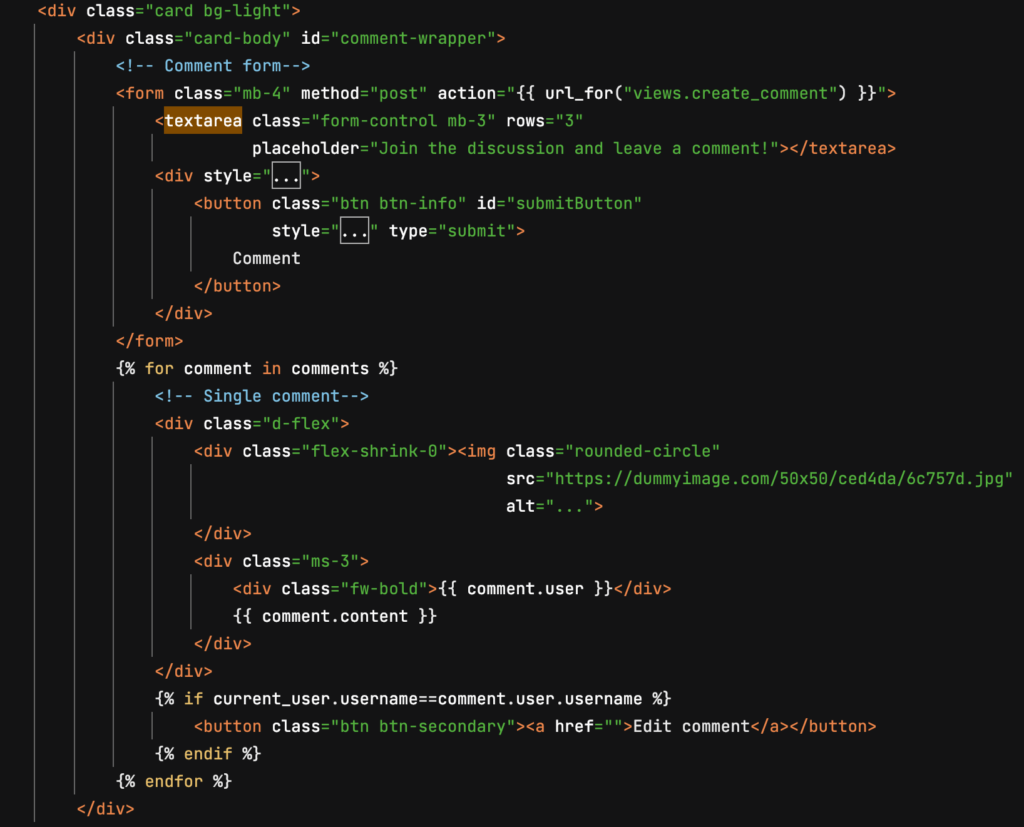
위와 같은 폼을 작성하고, 댓글을 나타낼 수 있도록 해 보겠습니다.

            <!--comment -->
            <section class="mb-5">
                <div class="card bg-light">
                    <div class="card-body" id="comment-wrapper">
                        <!-- Comment form-->
                        <form class="mb-4" method="post" action="{{ url_for("views.create_comment", id=post.id) }}">
                            {{ form.csrf_token }}
                            <textarea class="form-control mb-3" rows="3" name="content"
                                      placeholder="Join the discussion and leave a comment!"></textarea>
                            <div style="text-align: right">
                                <button class="btn btn-info" id="submitButton"
                                        style="width: 150px;height: 45px; font-size: 12px;" type="submit">
                                    Comment
                                </button>
                            </div>
                        </form>
                        {% for comment in comments %}
                            <!-- Single comment-->
                            <div class="d-flex">
                                <div class="flex-shrink-0"><img class="rounded-circle"
                                                                src="https://dummyimage.com/50x50/ced4da/6c757d.jpg"
                                                                alt="...">
                                </div>
                                <div class="ms-3">
                                    <div class="fw-bold">{{ comment.user }}</div>
                                    {{ comment.content }}
                                </div>
                            </div>
                            {% if current_user.username==comment.user.username %}
                                <button class="btn btn-secondary"><a href="">Edit comment</a></button>
                            {% endif %}
                        {% endfor %}
                    </div>
                </div>
            </section>
댓글 모델 작성하기
댓글은 어떤 식으로 이루어져 있을까요? 일단 댓글은 게시물에 달리는 것이고, 하나의 게시물에는 여러 개의 댓글이 달릴 수 있습니다. 또, 하나의 댓글은 여러 개의 게시물에 속할 수 없죠. 이는 카테고리-게시물과 같은 다대일 관계입니다.
class Comment(db.Model):
    id = db.Column(db.Integer, primary_key=True)  # id : 유일 키, Integer
    content = db.Column(db.Text(), nullable=False)
    created_at = db.Column(db.DateTime(timezone=True), default=func.now())  # 생성일자, 기본적으로 현재가 저장되도록 함
    author_id = db.Column(db.Integer, db.ForeignKey('user.id', ondelete='CASCADE'),
                          nullable=False)  # 외래 키, user 테이블의 id를 참조할 것이다!
    user = db.relationship('User', backref=db.backref('users', cascade='delete'))
    post_id = db.Column(db.Integer, db.ForeignKey('post.id', ondelete='CASCADE'),
                            nullable=False)  # 외래 키, post 테이블의 id를 참조할 것이다!
    post = db.relationship('Post', backref=db.backref('comments', cascade='delete'))

    def __repr__(self):
        return f'<{self.__class__.__name__}(title={self.content})>'
그러면, 위와 같은 모델을 만들어볼 수 있겠죠? models.py 에 위의 코드를 추가합니다.
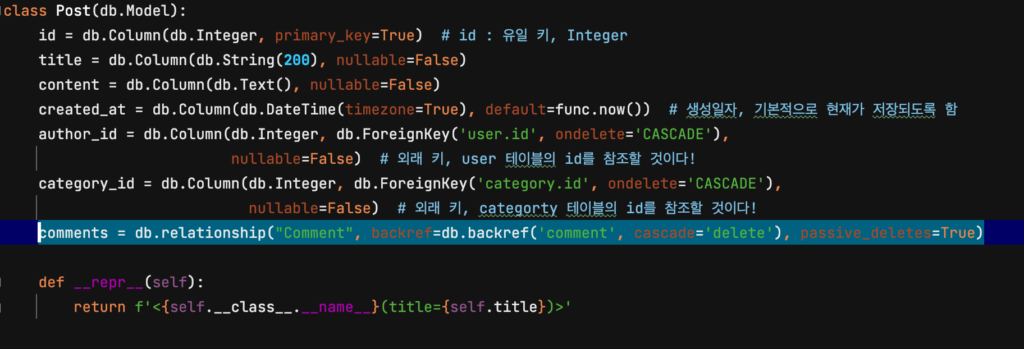
이후, backref 코드를 작성해 줍니다. (필자는 엄청 삽질 함..)
댓글 폼 검증을 위한 forms.py 작성하기
그리고, 우리는 Flask-WTForms를 이용해 댓글의 유효성 검증을 진행할 것이므로 아래와 같은 코드를 forms.py에 작성해줍니다.

테스트 코드 작성
댓글을 다는 과정을 생각해 보겠습니다.
- 댓글은 폼에서의 POST 요청을 보냄으로서 이루어집니다.
- “comment” 버튼을 누르면, 폼에 있는 내용이 서버로 전송되고, 그를 받아서 데이터베이스에 저장해야 합니다.
- 댓글을 저장하고 나면 댓글을 작성한 해당 게시물로 자동 이동해야 합니다.
- 댓글을 저장하고 나면 댓글이 해당 게시물에 잘 달려 있는 것을 확인해야 합니다.
- 댓글을 저장하고 나면 작성자가 제대로 표시되어야 합니다.
- 로그인을 한 사람만 댓글을 수정하거나 삭제할 수 있습니다.
class TestComment(unittest.TestCase):
    '''
    댓글은 폼에서의 POST 요청을 보냄으로서 이루어집니다.
    "comment" 버튼을 누르면, 폼에 있는 내용이 서버로 전송되고, 그를 받아서 데이터베이스에 저장해야 합니다.
    댓글을 저장하고 나면 댓글을 작성한 해당 게시물로 자동 이동해야 합니다.
    댓글을 저장하고 나면 댓글이 해당 게시물에 잘 달려 있는 것을 확인해야 합니다.
    댓글을 저장하고 나면 작성자가 제대로 표시되어야 합니다.
    로그인을 한 사람만 댓글을 수정할 수 있습니다.
    '''

    # 테스트를 위한 사전 준비
    def setUp(self):
        self.ctx = app.app_context()
        self.ctx.push()
        self.client = app.test_client()
        # 테스트를 위한 db 설정
        self.db_uri = 'sqlite:///' + os.path.join(basedir, 'test.db')
        app.config['SQLALCHEMY_TRACK_MODIFICATIONS'] = False
        app.config['TESTING'] = True
        app.config['WTF_CSRF_ENABLED'] = False
        app.config['SQLALCHEMY_DATABASE_URI'] = self.db_uri
        if not path.exists("tests/" + "test_db"):  # DB 경로가 존재하지 않는다면,
            db.create_all(app=app)  # DB를 하나 만들어낸다.

        # 2명의 유저 생성하기
        self.james = get_user_model()(
            email="jamesf@example.com",
            username="james",
            password="12345",
            is_staff=False,
        )
        db.session.add(self.james)
        db.session.commit()
        self.nakamura = get_user_model()(
            email="nk222f@example.com",
            username="nakamura",
            password="12345",
            is_staff=False,
        )
        db.session.add(self.nakamura)
        db.session.commit()

        # 댓글을 작성할 게시물 하나 생성하기
        self.example_post = get_post_model()(
            title="댓글 작성을 위한 게시물을 추가합니다.",
            content="부디 테스트가 잘 통과하길 바랍니다.",
            category_id="1",
            author_id=1 # 작성자는 james
        )
        db.session.add(self.example_post)
        db.session.commit()
        self.assertEqual(get_post_model().query.count(), 1)

    # 테스트가 끝나고 나서 수행할 것, 테스트를 위한 데이터베이스의 내용들을 모두 삭제한다.
    def tearDown(self):
        os.remove('test.db')
        self.ctx.pop()

    def test_add_comment(self):
        app.test_client_class = FlaskLoginClient
        with app.test_client(user=self.james) as james:
            response = james.post('/create-comment/1', data=dict(content="만나서 반갑습니다!"))
            self.assertEqual(302, response.status_code) # 댓글을 작성하면 해당 페이지로 자동 리디렉션되어야 한다.
            self.assertEqual(get_comment_model().query.count(), 1) # 작성한 댓글이 데이터베이스에 잘 추가되어 있는가?
            response = james.get('/posts/1')
            soup = BeautifulSoup(response.data, 'html.parser')
            comment_wrapper = soup.find(id="comment-wrapper")
            self.assertIn("만나서 반갑습니다!", comment_wrapper.text) # 작성한 댓글의 내용이 게시물의 상세 페이지에 잘 표시되는가?
            self.assertIn("james", comment_wrapper.text) # 작성자의 이름이 잘 표시되는가?
            self.assertIn("Edit comment", comment_wrapper.text) # 작성자로 로그인되어 있을 경우 수정 버튼이 잘 표시되는가?
            james.get('/auth/logout') # james에서 로그아웃
        with app.test_client(user=self.nakamura) as nakamura:
            response = james.get('/posts/1')
            soup = BeautifulSoup(response.data, 'html.parser')
            comment_wrapper = soup.find(id="comment-wrapper")
            self.assertNotIn("Edit comment", comment_wrapper.text) # 작성자로 로그인되어 있지 않을 경우 수정 버튼이 보이지 않는가?
위와 같은 테스트 코드의 형태를 생각할 수 있을 겁니다.
그리고, post_detail의 코드를 아래와 같이 수정합니다. 댓글 폼에 대한 정보를 템플릿에 넘겨주어야 하니까요!

댓글 생성, 조회 구현하기
코드를 작성했으니, 이제 테스트를 수행해 볼까요?

일단은, create-post/(게시물 id) 에 대한 라우팅이 존재하지 않아 위의 문제가 발생합니다. 이쯤 되면, 폼으로부터 데이터를 받아와 데이터베이스에 저장하는 건 익숙하죠? 아래의 코드를 작성합니다. (views.py)
@login_required
@views.route("/create-comment/<int:id>", methods=['POST'])
def create_comment(id):
    form = CommentForm()
    if request.method == "POST" and form.validate_on_submit():
        comment = get_comment_model()(
            content=form.content.data,
            author_id=current_user.id,
            post_id=id
        )
        db.session.add(comment)
        db.session.commit()
        return redirect(url_for("views.post_detail", id=id))
이후 테스트 코드를 돌려 보세요. 서버가 상태 코드로 404를 반환한다는 메시지 대신, “댓글은 데이터베이스에 들어갔는데, 내용이 표시되질 않아!” 라는 불평불만을 늘어놓을 겁니다.
댓글은 포스트 상세 페이지에서 보여져야 하므로, post_detail 에서 템플릿으로 context를 넘겨줄 때에 “이 포스트가 가지고 있는 전체 댓글은 이거야!” 라고 알려주어야 합니다. 그리고, 그 코드는 아래와 같을 겁니다.

템플릿에 그것을 넘겨주었으므로 뿌려줄 수 있겠죠?

그리고, 테스트 코드를 수행해 보세요. “저자가 표시되어야 한다”, “내용이 표시되어야 한다” 라는 부분은 넘어갔고, “댓글 수정하기 버튼이 없어!” 라고 알려줄 겁니다.

우리는 댓글을 작성한 사람만 댓글을 수정할 수 있도록 처리할 겁니다.
                            {% if current_user.username==comment.user.username %}
                                <button class="btn btn-secondary"><a href="">Edit comment</a></button>
                            {% endif %}
의 코드를 작성함으로서 처리할 수 있겠죠?
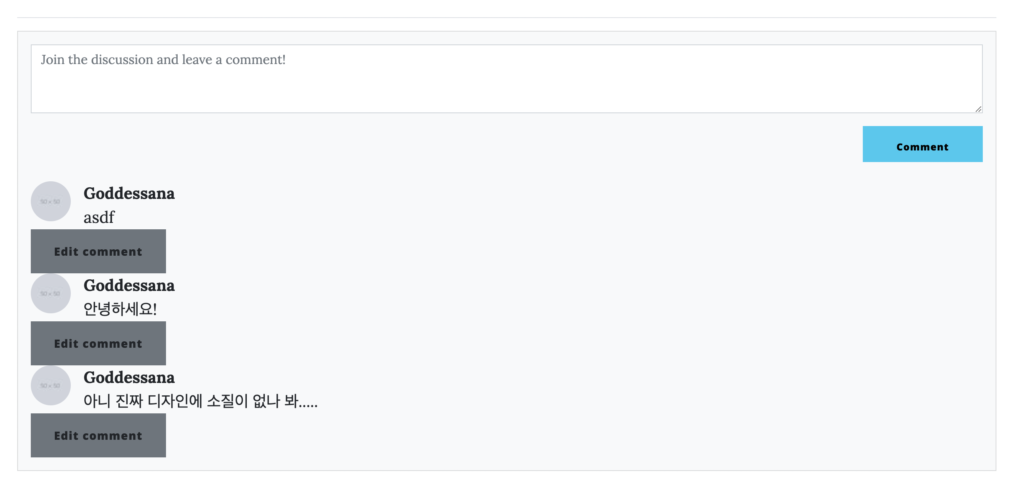
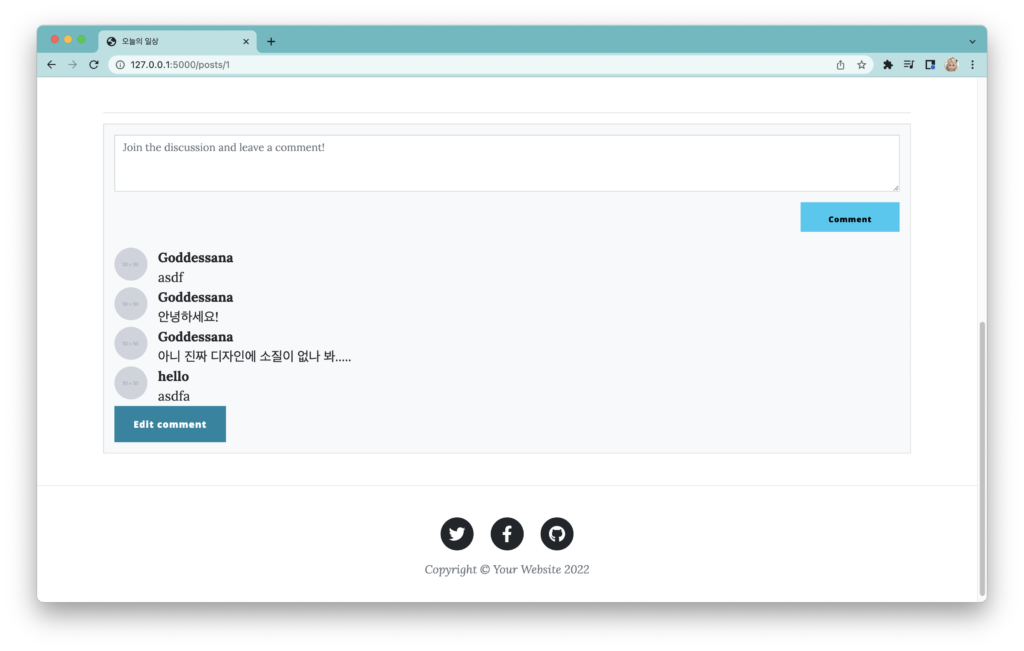
실제로 댓글을 달아 보세요. “댓글을 작성하고, 작성한 댓글이 표시되는 것” 까지 잘 동작할 겁니다.
댓글 수정 구현하기
일단 테스트 코드를 작성해 볼까요? 요구사항과 테스트 코드의 형태는 아래와 같을 겁니다.
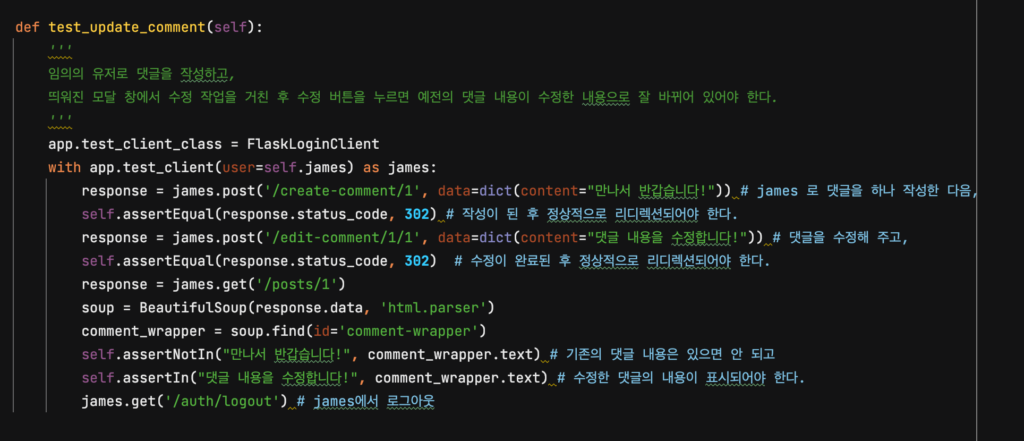
    def test_update_comment(self):
        '''
        임의의 유저로 댓글을 작성하고,
        띄워진 모달 창에서 수정 작업을 거친 후 수정 버튼을 누르면 예전의 댓글 내용이 수정한 내용으로 잘 바뀌어 있어야 한다.
        '''
        app.test_client_class = FlaskLoginClient
        with app.test_client(user=self.james) as james:
            response = james.post('/create-comment/1', data=dict(content="만나서 반갑습니다!")) # james 로 댓글을 하나 작성한 다음,
            self.assertEqual(response.status_code, 302) # 작성이 된 후 정상적으로 리디렉션되어야 한다.
            response = james.post('/edit-comment/1/1', data=dict(content="댓글 내용을 수정합니다!")) # 댓글을 수정해 주고,
            self.assertEqual(response.status_code, 302)  # 수정이 완료된 후 정상적으로 리디렉션되어야 한다.
            response = james.get('/posts/1')
            soup = BeautifulSoup(response.data, 'html.parser')
            comment_wrapper = soup.find(id='comment-wrapper')
            self.assertNotIn("만나서 반갑습니다!", comment_wrapper.text) # 기존의 댓글 내용은 있으면 안 되고
            self.assertIn("댓글 내용을 수정합니다!", comment_wrapper.text) # 수정한 댓글의 내용이 표시되어야 한다.
            james.get('/auth/logout') # james에서 로그아웃
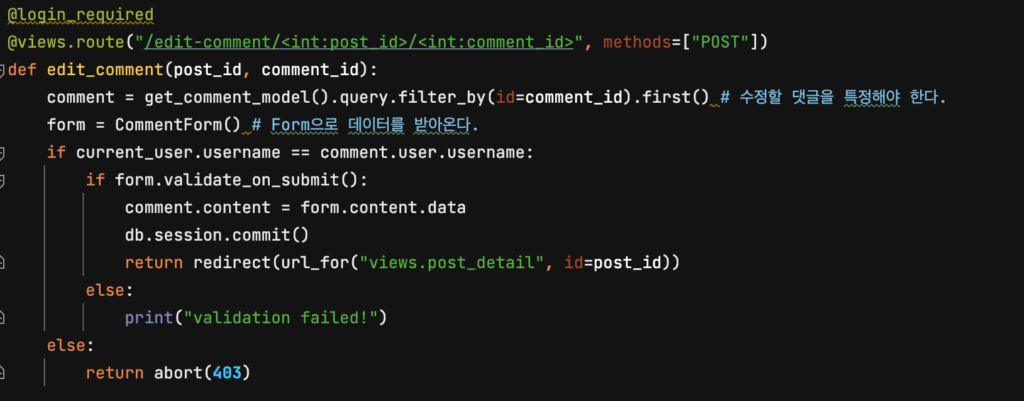
테스트 코드를 수행해 보세요. /edit-comment 에 대한 라우팅을 구현하지 않았으므로 당연히 테스트에 통과하지 못할 겁니다.

폼 데이터를 받아오는 일련의 작업은 이제 익숙하지 않나요? 포스트 수정과 유사하지만 필드가 더 적다는 점이 다릅니다. 간단하죠!

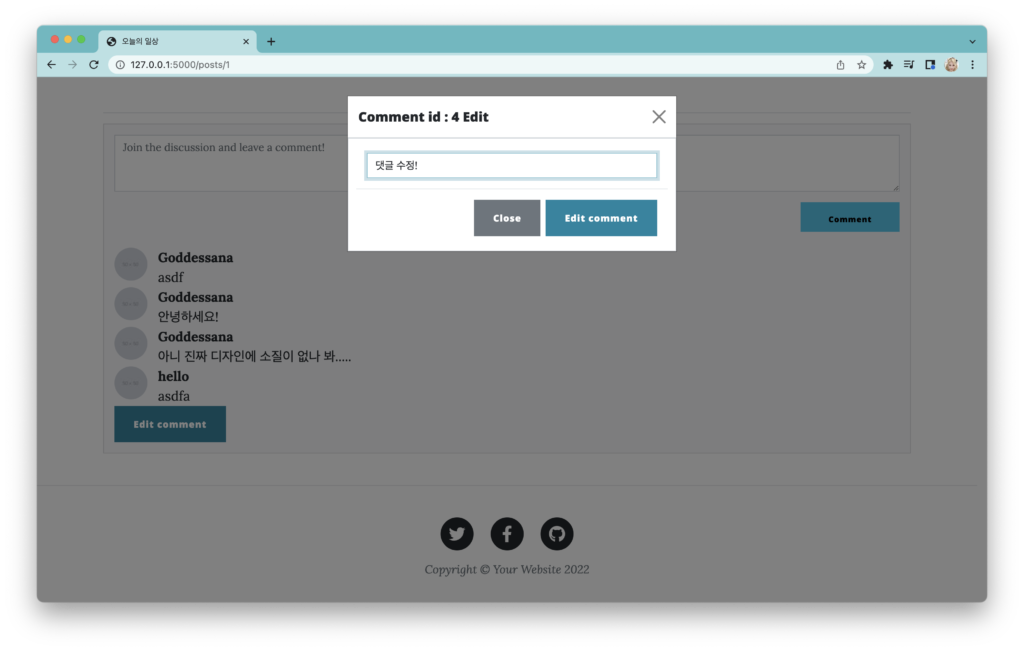
                            {% if current_user.username==comment.user.username %}
                                <!-- 수정 버튼 -->
                                <button type="button" class="btn btn-primary" data-bs-toggle="modal"
                                        data-bs-target="#editCommentModal{{ comment.id }}">
                                    Edit comment
                                </button>
                                <!-- Modal -->
                                <div class="modal fade" id="editCommentModal{{ comment.id }}" tabindex="-1"
                                     aria-labelledby="exampleModalLabel" aria-hidden="true">
                                    <div class="modal-dialog">
                                        <div class="modal-content">
                                            <div class="modal-header">
                                                <h5 class="modal-title" id="exampleModalLabel">Comment id
                                                    : {{ comment.id }} Edit</h5>
                                                <button type="button" class="btn-close" data-bs-dismiss="modal"
                                                        aria-label="Close"></button>
                                            </div>
                                            <form method="post" class="form-control"
                                                  action="{{ url_for("views.edit_comment", post_id=post.id, comment_id=comment.id) }}">
                                                {{ form.csrf_token }}
                                                <div class="modal-body">
                                                    <input type="text" class="form-control" name="content"
                                                           value="{{ comment.content }}"/>
                                                </div>
                                                <div class="modal-footer">
                                                    <button type="button" class="btn btn-secondary"
                                                            data-bs-dismiss="modal">
                                                        Close
                                                    </button>
                                                    <button type="submit" class="btn btn-primary">Edit comment</button>
                                                </div>
                                            </form>
                                        </div>
                                    </div>
                                </div>

                            {% endif %}
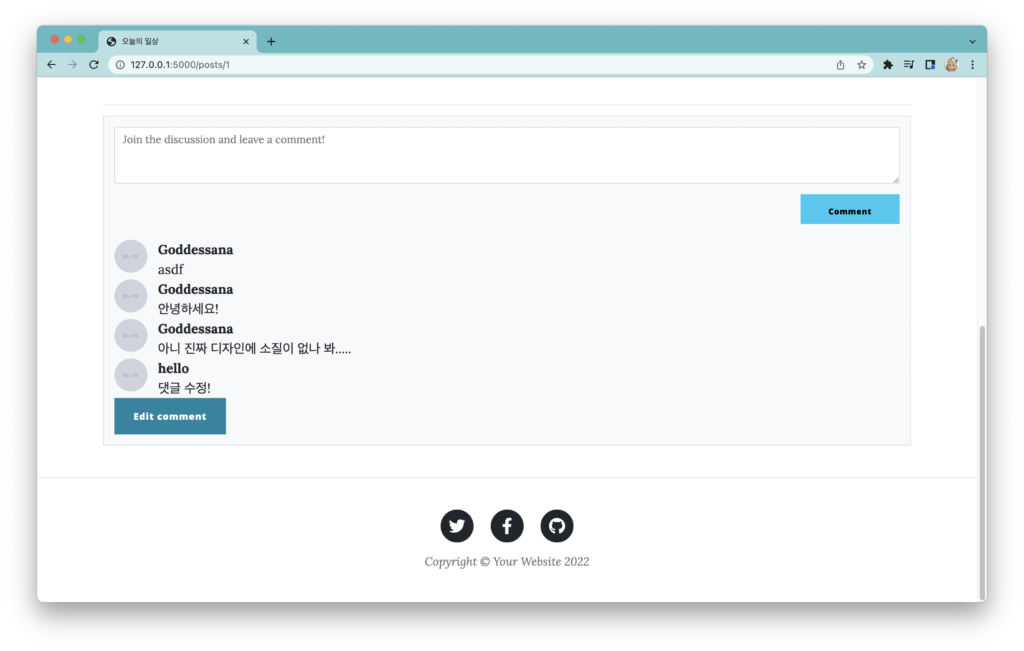
폼 부분을 부트스트랩을 사용하게끔 수정한 다음, 수정을 해 보세요. 잘 동작할 겁니다.
게시물, 댓글 삭제 처리하기
게시물과 댓글의 삭제는 “/delete-post/post의 id” 로 요청이 들어오거나, “/delete-comment/post의 id/comment의 id” 로 요청이 들어온다면, 데이터베이스에서 해당 포스트와 댓글을 삭제하는 식으로 구현할 겁니다.
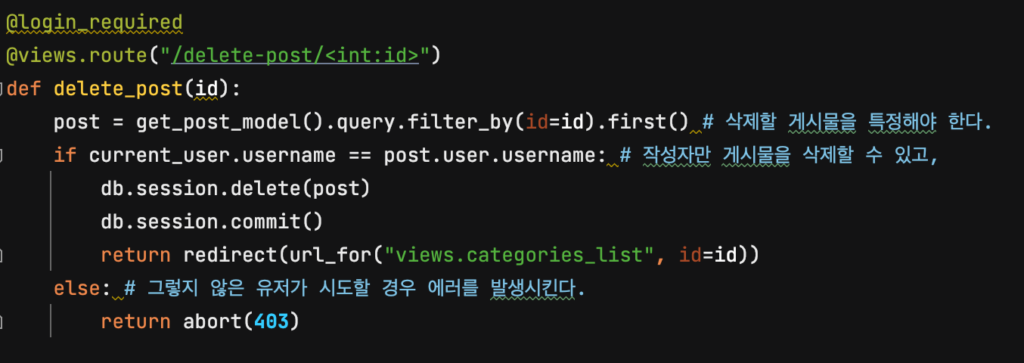
/delete-post/ 의 아이디어는 위와 같이 구현할 수 있을 겁니다. db.sesssion.delete(post) 로 데이터베이스에서 게시물을 삭제하는 과정을 처리하는 걸 알 수 있죠? 함수의 원형을 찾아가 보면, 실제 delete() 가 호출될 때에 “데이터베이스에서의 삭제” 가 수행되는 것은 아니고, flush() 가 호출될 때에 그 작업이 수행되는 것을 알 수 있습니다. – 이 과정에 대해서는, API를 구축할 때에 조금 더 심도있게 다룰 수 있도록 하겠습니다. 아무튼, delete() 후 commit() 을 수행하면, 데이터베이스에서 데이터가 지워진다는 겁니다.
위의 로직에서, 우리는 current_user.username == post.user.username 일 때에만 게시물의 삭제를 허용했으므로 템플릿 단에서도 “게시물을 작성한 사람만 수정, 삭제 버튼이 보이도록” 처리할 수 있을 겁니다.
{% block header %}
    <!-- Page Header-->
    <header class="masthead" style="background-image: url('assets/img/post-bg.jpg')">
        <div class="container position-relative px-4 px-lg-5">
            <div class="row gx-4 gx-lg-5 justify-content-center">
                <div class="col-md-10 col-lg-8 col-xl-7">
                    <div class="post-heading">
                        <div id="title-wrapper"><h1>{{ post.title }}</h1></div>
                        <span class="meta">
                            <div id="author-wrapper"><p>Posted by : <a href="#!">{{ post.user.username }}</a></p></div>
                            <p>created_at : {{ post.created_at }}</p>
                            <!-- 게시물의 작성자만 "수정", "삭제" 버튼이 보임 -->
                            {% if post.user.username == current_user.username %}
                                <!-- 게시물 수정 버튼 -->
                                <button class="btn btn-info" style="padding: 5px; margin: 10px;" id="edit-button">
                                <a href="{{ url_for("views.edit_post", id=post.id) }}">Edit</a>
                                </button>
                                <!-- 게시물 삭제 버튼 -->
                                <button class="btn btn-danger" style="padding: 5px; margin: 10px;" id="edit-button">
                                <a href="{{ url_for("views.delete_post", id=post.id) }}">Delete</a>
                                </button>
                            {% endif %}
                            </span>
                    </div>
                </div>
            </div>
        </div>
    </header>
{% endblock %}
post_detail.html 의 헤더 부분을 위의 if문으로 처리하면 되겠죠? 실제로 테스트해 보세요. (게시물의 CRUD, 댓글의 CRUD). 잘 동작할 겁니다.
Contact Form 을 이용해서 메일 전송 구현하기
Contact Form 을 이용해서, 사용자가 관리자 계정으로 이메일을 보낼 수 있도록 구현해 보겠습니다. 이전의 에피소드에서 꾸준히 다뤄 왔던 부분은 폼 데이터를 받아서 데이터베이스에 저장하는 것이었습니다. 이번에는, 외부 라이브러리를 활용하여 플라스크로 이메일을 보낼 수 있도록 하고, 동시에 데이터베이스에 저장하는 작업도 수행할 겁니다.
우리는 flask-mail 이라는 라이브러리를 이용할 겁니다. pip install flask-mail 을 입력하여 설치해 주세요.


일단 전송된 데이터들이 데이터베이스에 저장되기 위해서는 모델이 있어야 하겠죠? 저는 이메일을 보낼 때에 문의하는 사람의 이메일과 이름은 그대로 입력될 수 있도록 할 것이고, 추가로 핸드폰 번호와 메시지만 입력하게끔 해 볼 겁니다.
class ContactMessage(db.Model):
    id = db.Column(db.Integer, primary_key=True)
    author_id = db.Column(db.Integer, db.ForeignKey('user.id', ondelete='CASCADE'),
                          nullable=False)
    user = db.relationship('User')
    created_at = db.Column(db.DateTime(timezone=True), default=func.now())
    phone = db.Column(db.String(12), nullable=False)
    message = db.Column(db.String(500), nullable=False)

def get_contact_message_model():
    return ContactMessage
class ContactMessageForm(FlaskForm):
    phone = TelField('phone', validators=[DataRequired()])
    message = StringField('message', validators=[DataRequired()])
결과적으로 위의 두 개의 모델과 폼을 구성할 수 있을 겁니다. 이제 라우팅을 한번 건드려 볼까요? 기본적으로, /contact 는 GET, POST 요청을 받아들일 수 있어야 합니다. GET 요청을 받을 때는 폼을 띄워줘야 하고, POST 요청을 받았을 때에는 폼에서 받아온 데이터를 저장하고 – 그 내용을 바탕으로 이메일을 전송하는 과정을 거쳐야 하기 때문입니다. 지금까지 했던 로그인, 회원가입, 게시물 작성 기능을 구현하는 것과 거의 똑같죠.
우리는 컨택트 폼을 로그인한 사람에게만 작성할 수 있도록 하게 해야 합니다. 위의 두 가지 아이디어를 근거로, 아래의 코드를 작성하는 건 꽤 합리적인 선택일 겁니다.

그리고, Http method의 종류에 따라 해당 라우팅이 하는 역할은 적절하게 분기되어야 합니다. 데이터를 조회하는 목적의 GET 요청이 들어오면 폼을 띄워주는 역할을, POST 요청으로 데이터를 보내 오면 받아온 데이터를 적절히 처리하는 과정을 거쳐야 하죠. 위의 아이디어를 코드로 옮긴다면, 아래와 같을 겁니다.
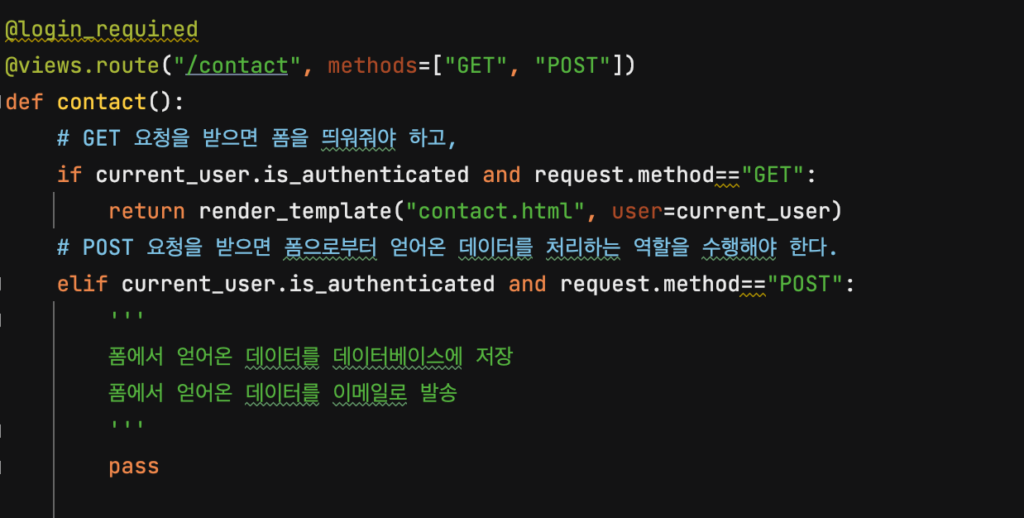
유효성 검증을 위한 폼도 템플릿에 전달해주어야 하므로, 폼에 대한 코드도 추가하겠습니다.
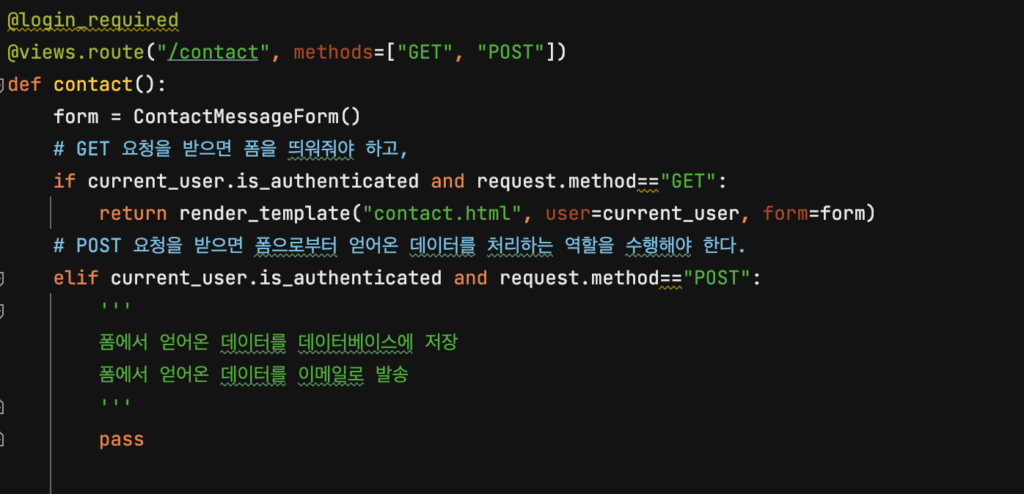
이제 폼을 약간 수정해 줄까요? “이름”, “이메일” 부분은 미리 채워져 있어야 하므로 value 에 넣어주고, 수정하면 안 되는 부분이므로 readonly 라는 코드도 추가합니다. 또 위의 사진에는 포함되지 않았지만 폼의 전송 방식도 post로 변경해 줍니다.
{% extends 'base.html' %}

{% block title %}Contact{% endblock %}

{% block header %}
<!-- Page Header-->
<header class="masthead" style="background-image: url('{{ url_for('static', filename='assets/img/contact-bg.jpg') }}')">
    <div class="container position-relative px-4 px-lg-5">
        <div class="row gx-4 gx-lg-5 justify-content-center">
            <div class="col-md-10 col-lg-8 col-xl-7">
                <div class="page-heading">
                    <h1>Contact Me</h1>
                    <span class="subheading">Have questions? I have answers.</span>
                </div>
            </div>
        </div>
    </div>
</header>
{% endblock %}

{% block content %}
<!-- Main Content-->
<main class="mb-4">
    <div class="container px-4 px-lg-5">
        <div class="row gx-4 gx-lg-5 justify-content-center">
            <div class="col-md-10 col-lg-8 col-xl-7">
                <p>궁굼한 점이 있다면 꼭 연락주세요. :)</p>
                <div class="my-5">
                    <form id="contactForm" method="post">
                        {{ form.csrf_token }}
                        <div class="form-floating">
                            <input class="form-control" id="name" name="name" type="text" value="{{ current_user.username }}"
                                   data-sb-validations="required" readonly/>
                            <label for="name">Name</label>
                            <div class="invalid-feedback" data-sb-feedback="name:required">A name is required.</div>
                        </div>
                        <div class="form-floating">
                            <input class="form-control" id="email" name="email" type="email" value="{{ current_user.email }}"
                                   data-sb-validations="required,email" readonly/>
                            <label for="email">Email address</label>
                            <div class="invalid-feedback" data-sb-feedback="email:required">An email is required.</div>
                            <div class="invalid-feedback" data-sb-feedback="email:email">Email is not valid.</div>
                        </div>
                        <div class="form-floating">
                            <input class="form-control" id="phone" type="tel" name="phone" placeholder="Enter your phone number..."
                                   data-sb-validations="required"/>
                            <label for="phone">Phone Number</label>
                            <div class="invalid-feedback" data-sb-feedback="phone:required">A phone number is
                                required.
                            </div>
                        </div>
                        <div class="form-floating">
                            <textarea class="form-control" id="message" name="message" placeholder="Enter your message here..."
                                      style="height: 12rem" data-sb-validations="required"></textarea>
                            <label for="message">Message</label>
                            <div class="invalid-feedback" data-sb-feedback="message:required">A message is required.
                            </div>
                        </div>
                        <br/>
                        <button class="btn btn-primary text-uppercase" id="submitButton" type="submit">Send
                        </button>
                    </form>
                </div>
            </div>
        </div>
    </div>
</main>
{% endblock %}
<form id="contactForm" method="post">
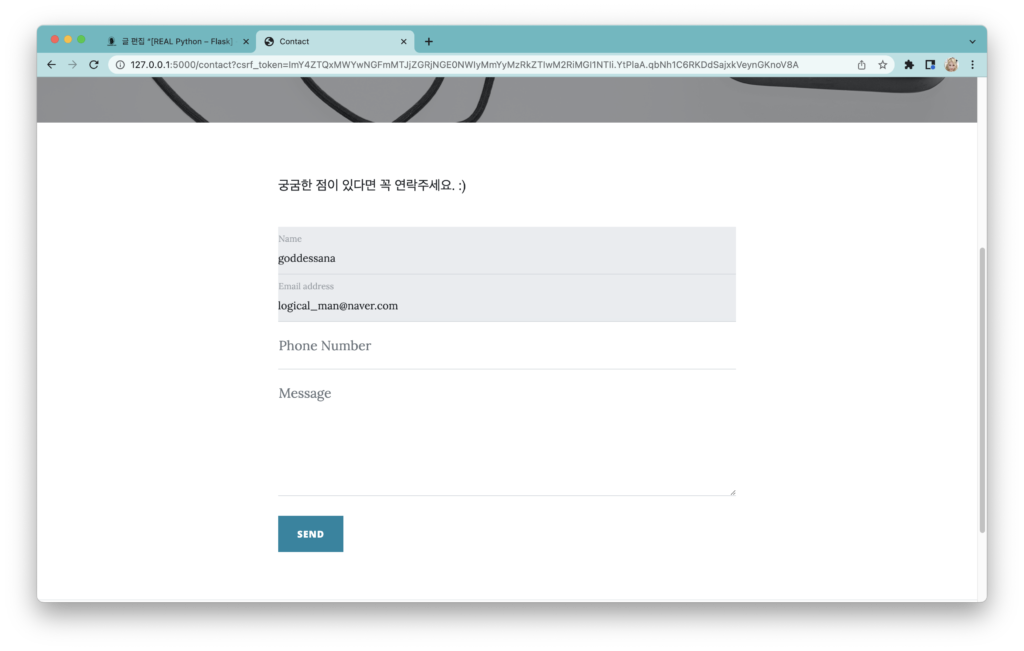
이후, 폼에 접속해 보세요. 로그인한 사람의 이름과 이메일로 폼이 잘 채워져 있고, 수정은 불가능할 겁니다.
그런데, 로그인하지 않은 사람으로 접속하면 아래와 같이 에러가 나옵니다.
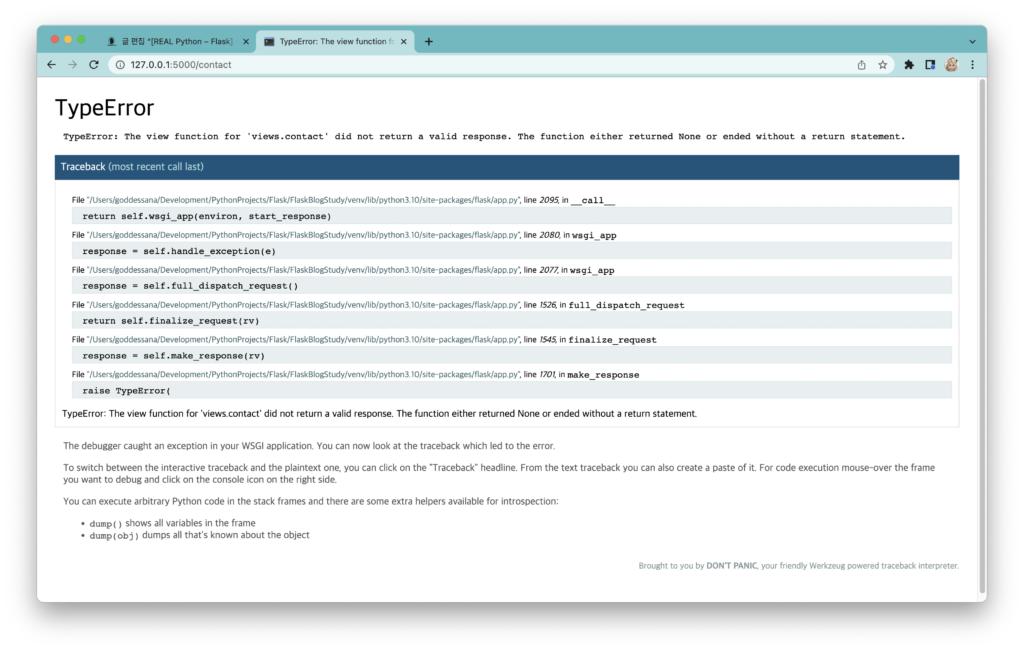
에러 메시지를 읽어 보면, contact 함수가 적절한 리턴값을 주지 않는다고 되어 있죠?
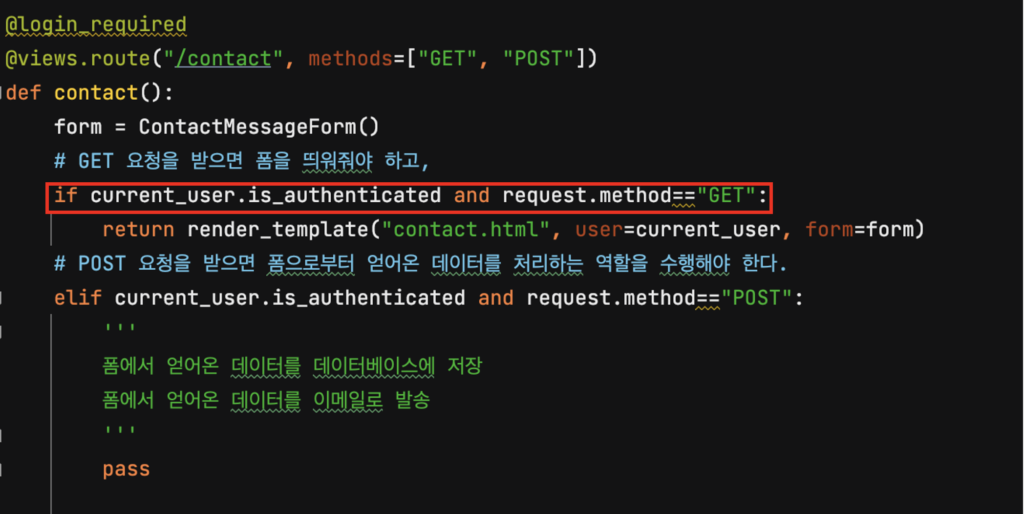
우리는 “현재 유저가 로그인되어 있고, GET요청을 보내올 경우” 컨택트 폼 페이지를 띄워 주도록 설계했습니다. 그런데, 위의 if문에 걸리지 않았으므로 적절한 리턴값이 없다는 겁니다. 우리는 로그인하지 않은 경우, 홈 페이지로 리다이렉트 시켜 주고 “컨택트 폼을 작성하기 위해선 로그인이 필요합니다.” 라는 에러 메시지를 띄워 주도록 하겠습니다.
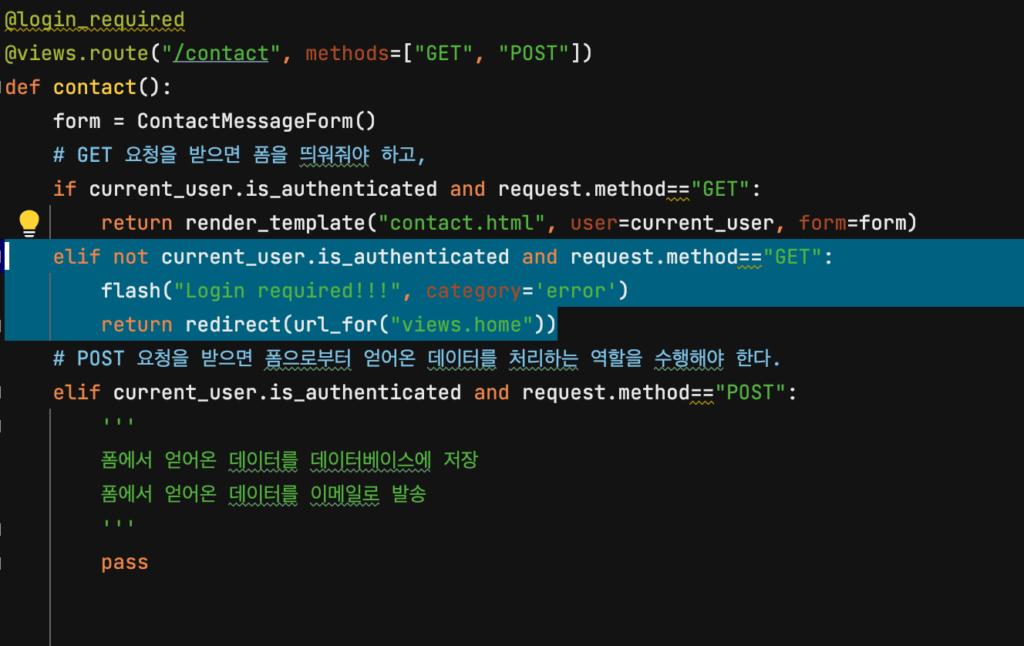
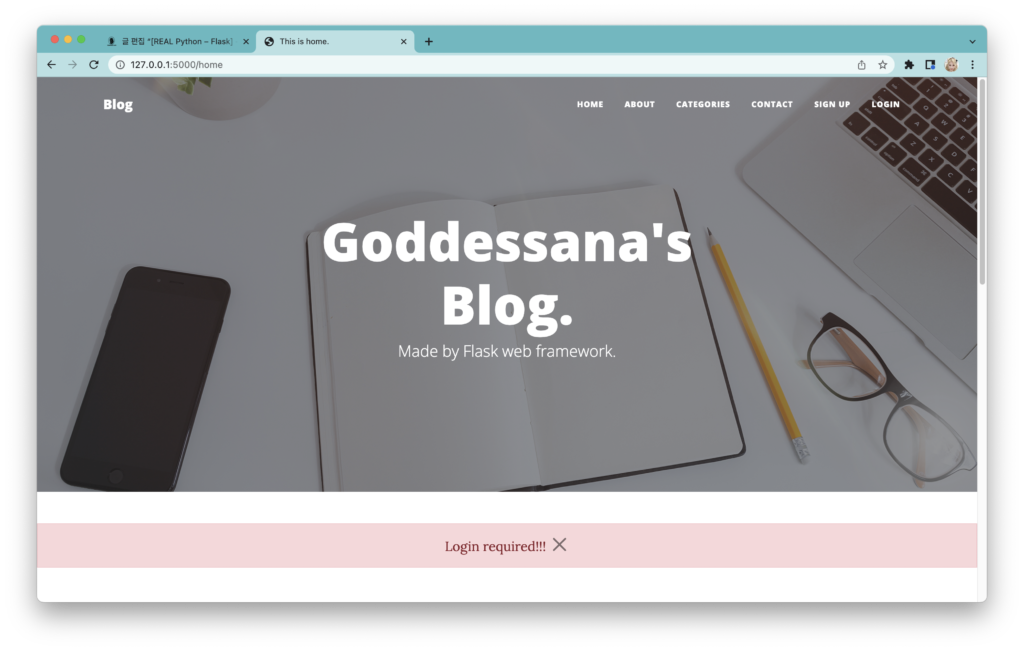
이후, 위의 조건을 만족하는 코드를 작성해 주세요. 아래와 같이 바로 홈 페이지로 이동되는 동시에 에러 메시지가 나타날 겁니다.
이후 다음의 흐름은 폼에서 받아온 데이터를 데이터베이스에 저장하는 것입니다. 아래의 코드로 그것을 수행할 수 있겠죠?
@login_required
@views.route("/contact", methods=["GET", "POST"])
def contact():
    form = ContactMessageForm()
    # GET 요청을 받으면 폼을 띄워줘야 하고,
    if current_user.is_authenticated and request.method=="GET":
        return render_template("contact.html", user=current_user, form=form)
    elif not current_user.is_authenticated and request.method=="GET":
        flash("Login required!!!", category='error')
        return redirect(url_for("views.home"))
    # POST 요청을 받으면 폼으로부터 얻어온 데이터를 처리하는 역할을 수행해야 한다.
    elif current_user.is_authenticated and request.method=="POST":
        '''
        폼에서 얻어온 데이터를 데이터베이스에 저장
        폼에서 얻어온 데이터를 이메일로 발송
        '''
        if form.validate_on_submit():
            author_id = current_user.id
            phone = form.phone.data
            message = form.message.data
            contact_message = get_contact_message_model()(
                author_id = author_id,
                phone = phone,
                message = message
            )
            db.session.add(contact_message)
            db.session.commit()
            flash("Form submitted!")
            return redirect(url_for("views.home"))
이제, 폼을 작성해서 제출해 보세요. 정상적으로 폼이 작성되었다는 메시지와 함께, 데이터베이스에는 우리가 보낸 메시지가 담겼을 겁니다.

이제, 폼에서 어드민 페이지에서 데이터를 조회할 수 있도록 __init__.py 에 우리가 만든 ContactMessage 모델을 등록해 주겠습니다.
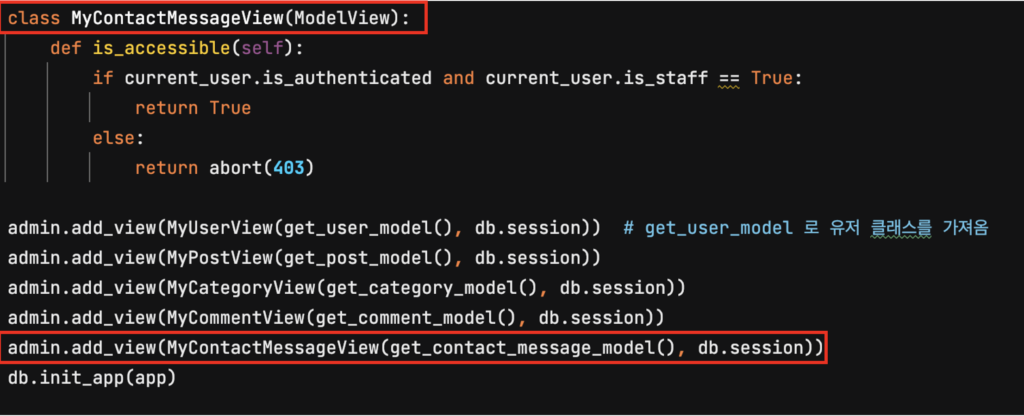
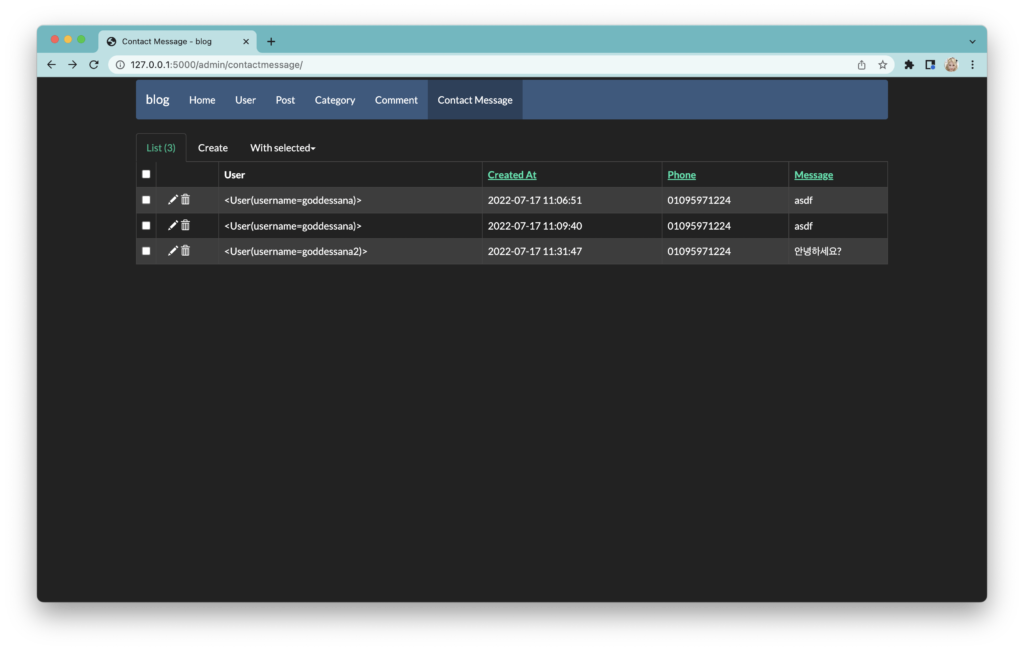
위의 모델을 등록했으므로, 폼에서 받아온 데이터를 받아 데이터베이스에 등록하는 일련의 작업을 마쳤습니다!
이를 기반으로 해서 여러 가지 서브 기능들을 구현할 수 있겠죠? 예를 들면, “이 문의사항이 처리되었는가?” 에 대한 불리언 필드를 하나 만들어서, “아직 처리되지 않은 문의사항” 만 리스트로 띄워 주는 것도 가능할 겁니다.
추가과제
위의 내용과 더불어, 아래의 내용을 구현해 주세요!
- home 페이지에 데이터베이스에 있는 가장 최근 게시물 5개 나타내기
- “is_staff == True” 인 유저가 로그인한 경우, “관리자 페이지로” 이동하는 네비게이션 바 구현하기
- About 페이지 각자에 맞게 완성하기

The JBL Flip 6 is my sound soulmate!
https://wifidb.science/wiki/User:ClarkCassidy51
The JBL Flip 5 is a classic for a reason – amazing!
https://wifidb.science/wiki/JBL_48f
JBL’s value is pure fire!
https://ai-db.science/wiki/JBL_45z