[Flask] – “인스타그램 클론코딩 – Instagram Clone (10)”
[Flask] – “인스타그램 클론코딩 – Instagram Clone (10)”

팔로우한 유저가 한 명도 없는 경우, 본인의 글만 뜨도록 수정하기
이전에 구성했던 로직은 “팔로우한 사람이 아무도 없는 경우, 아무런 게시물도 뜨지 않게” 했었습니다. 이러한 경우는 어떨까요? 팔로우한 사람이 아무도 없는데, 내가 게시물을 작성한 겁니다. 이전에 구성했던 로직대로라면, 아무리 본인이 글을 작성한다고 한들 본인의 게시물을 볼 수 없을 겁니다. 이러한 로직을 말이 되게 수정해봅시다.

api.models.post.py 의 PostModel 의 filter_by_followed() 메서드를 위와 같이 수정합니다. (추가 인자를 넘겨준 것을 꼭 체크하세요!) 마지막에서 두 번째 줄을 보면, 팔로우하는 사람들의 리스트에 [request_user] 를 더해주는 것을 볼 수 있죠? 만약 요청한 사람이 누구도 팔로우하고 있지 않은 경우, 위의 게시물은 본인의 글만 필터링하여 보여줄 겁니다.
그러면 api.resources.post.py 의 PostList 클래스의 get() 메서드 중 일부를 아래와 같이 request_user 를 추가로 넘겨주는 방식으로 수정하겠습니다.

좋아요.
현재 로그인한 유저는 helloworld 이고, helloworld 는 아무도 팔로우하고 있지 않습니다. 그렇다면 게시물은 helloworld 가 작성한 글만 떠야 합니다.

그리고, 추가로 “자바스크립트싫어” 유저를 팔로우하겠습니다.
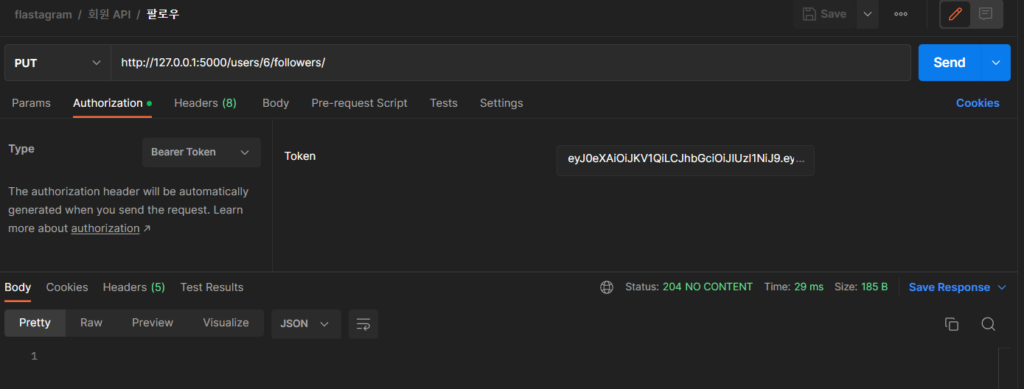
이후에 글 목록을 확인해 보면, “자바스크립트싫어” 유저가 작성한 글도 추가로 로드되네요!

좋습니다!
팔로우할 유저 랜덤 추천 구현하기

오른쪽 부분을 살펴봅시다. 이 곳의 윗 부분에는 “현재 로그인한 유저” 가, 아랫쪽에는 “랜덤하게 팔로우할 사람을 3명 정도 추천” 해 주도록 구현해 보겠습니다.
그러면, 첫째로 생각나는 것은, “로그인한 유저, 그리고 내가 이미 팔로우한 유저는 추천 목록에 뜨지 않아야 한다” 입니다. 본인이 이미 팔로우했는데, “이 사람 팔로우해봐!” 처럼 말하는 것만큼 이상한 일은 없겠죠.
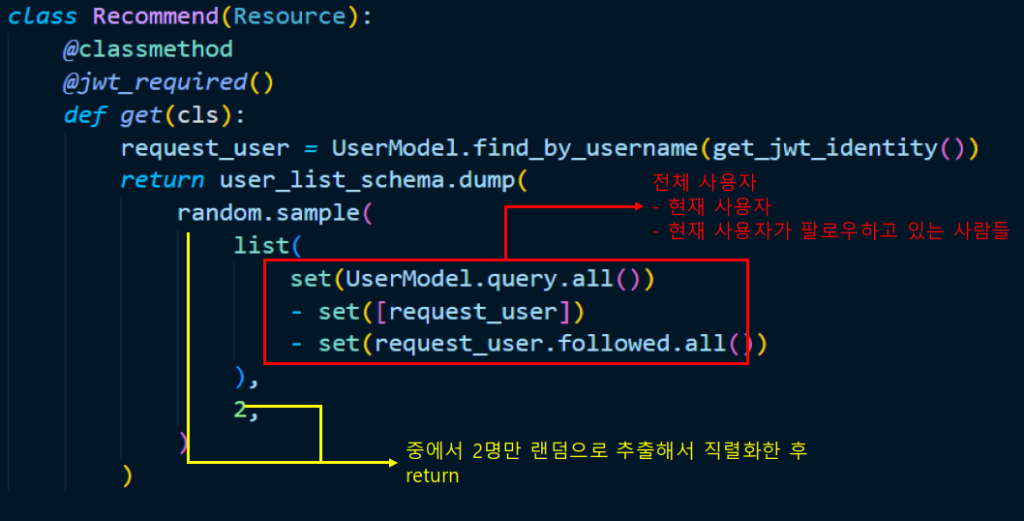
[모든 사용자] – [내가 팔로우한 사람들] – [나 자신] 중 랜덤하게 2명의 사용자를 뽑아 보여주면 되겠습니다.backend/api/__init__.py 에 아래와 같이 새로운 리소스를 등록하겠습니다.


그리고 구현은 아래와 같겠습니다. (api.resources.user.py)

먼저 위처럼 새로운 스키마를 하나 작성한 후,
class Recommend(Resource):
    @classmethod
    @jwt_required()
    def get(cls):
        request_user = UserModel.find_by_username(get_jwt_identity())
        return user_list_schema.dump(
            random.sample( # import random
                list(
                    set(UserModel.query.all())
                    - set([request_user])
                    - set(request_user.followed.all())
                ),
                2,
            )
        )
위와 같은 코드를 작성하겠습니다. 코드가 꽤 직관적이죠? 논리는 아래와 같습니다.
그리고, postman 에서 아래의 주소를 넣어 테스트를 해 봅시다.
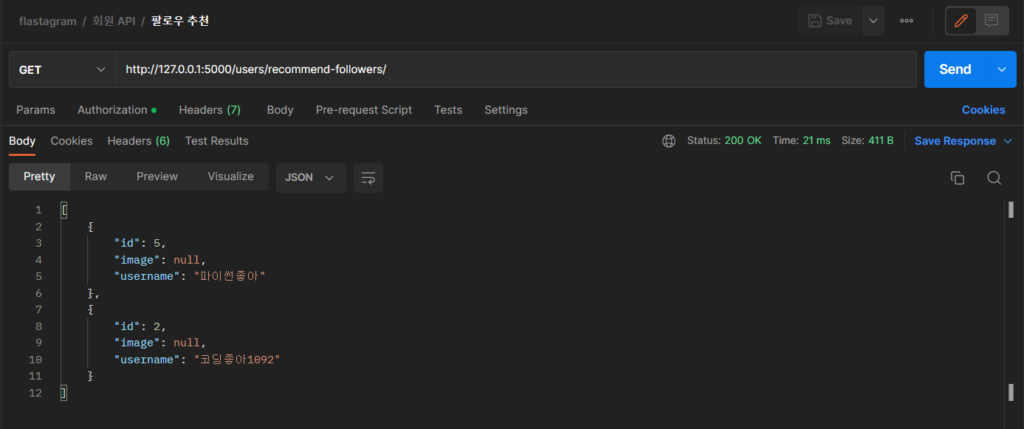
여기서 다시 한 번 요청을 보내면,
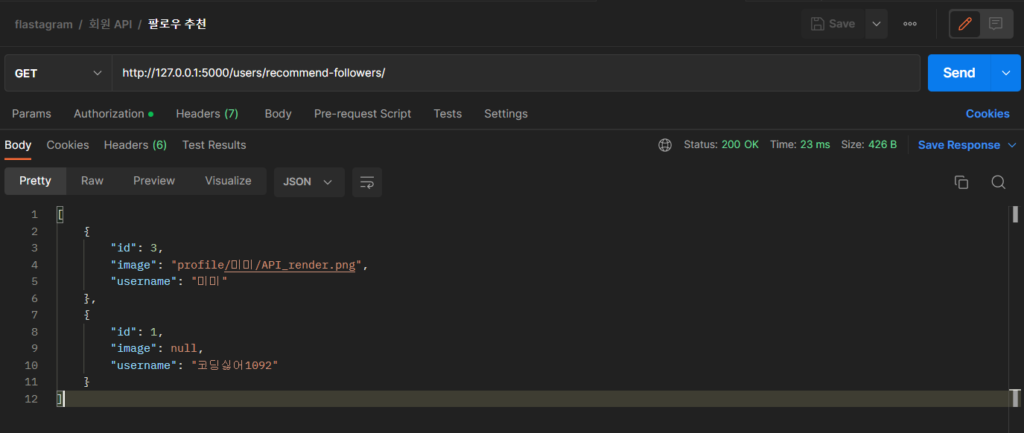
위와 같이 랜덤으로 계속 추천해주는 사람들이 바뀔 겁니다. :)
https://github.com/TGoddessana/flastagram/commit/101d6aa048e44983ab2310ec5f8f0ab352e65298 에서 전체를 확인할 수 있습니다!
좋아요. 그러면 해야 할 것은 이 사람들을 화면에 그려주는 겁니다. 백엔드에서 구현이 되었으므로 프론트엔드로 넘어갑시다.

구현의 시작은 우리의 API 서버 기능별 URL 을 정의함으로서 시작됩니다. variables.js 에 위의 코드를 작성하겠습니다.

그리고 post_list.html 에서 위와 같이 2개의 추천 프로필을 만들겠습니다. 우리가 목표로 하는 건, 아래와 같은 모습이니까요!
                <div class="profile-card recommend">
                    <div class="profile-pic">
                        <img src="" alt="">
                    </div>
                    <div>
                        <p class="username"></p>
                        <p class="sub-text"></p>
                    </div>
                    <button class="action-btn">Follow</button>
                </div>
                <div class="profile-card recommend">
                    <div class="profile-pic">
                        <img src="" alt="">
                    </div>
                    <div>
                        <p class="username"></p>
                        <p class="sub-text"></p>
                    </div>
                    <button class="action-btn">Follow</button>
                </div>
이제 팔로우 버튼을 그럴듯하게 해 주기 위해서 나름대로 CSS도 수정하겠습니다.

post_list.css 에 대충 마우스 위로 올리면 색깔 바뀌도록 한번 해 보죠!
대충 도화지는 완성되었으므로 해야 할 것은 우리의 API를 받아와서 그 도화지를 다채롭게 색칠해 주는 것이 되겠습니다 :)

/**
 * 사용자 추천 API 를 사용해서 랜덤한 사용자 2명의 정보를 불러옵니다.
 */
async function getRecommendData(id) {
  let myHeaders = new Headers();
  myHeaders.append("Authorization", `Bearer ${ACCESS_TOKEN}`);
  myHeaders.append("Content-Type", "application/json");

  let requestOptions = {
    method: "GET",
    headers: myHeaders,
  };

  return await (await fetch(RECOMMEND_API_URL, requestOptions)).json();
}
구현의 시작은 역시 JS에서 우리의 랜덤 사용자 추천 API 를 불러오는 것으로 시작합니다.

이어서 위의 메서드를 작성합니다. 이전에 했던 작업들과 매우 유사하죠? 단순히 API로부터 얻어온 정보를 토대로 Element 를 선택하여 그것의 내용을 채워주는 코드입니다.
/**
 * 사용자 추천 API로부터 받아온 데이터로 화면을 그립니다.
 */
async function loadRecommend() {
  recommendElement = document.getElementsByClassName("recommend");
  let recommendData = await getRecommendData();
  for (let i = 0; i <= 1; i++) {
    console.log(recommendElement[i].children[0].children[0].src);
    recommendElement[i].children[0].children[0].src =
      STATIC_FILES_API_URL + recommendData[i]["image"];
    recommendElement[i].children[1].children[0].innerText =
      recommendData[i]["username"];
  }
}
서윗

마지막으로 위에 작성한 함수를 메인 함수에 등록해주면 되겠네요!

그리고 결과를 확인해 보세요. 위와 같이 랜덤 추천을 잘 해주는 것을 확인할 수 있고,

새로고침을 할 때마다 다른 사람을 추천해주는 것 또한 확인할 수 있을 겁니다. :)
무언가 불편한 그것, 수정하기

아시다시피 “프로필사진을 등록하지 않은 사람” 의 경우 위와 같이 이미지가 깨지게 됩니다. 이를 자바스크립트 단에서 처리할 수도, 그리고 백엔드 단에서 처리할 수도 있겠지만, 우리의 경우 백엔드 단에서 아래의 로직을 처리해보고자 합니다.
“사용자의 정보를 알려고 할 때, 해당 사용자의 프로필 사진이 없다면 기본 프로필 사진을 응답하도록 한다.”
그렇다면 생각의 흐름은 어떻게 흘러가는 게 바람직할까요? 잠시 고민해 봅시다.
- 우리의 목적은 “게시물에 나오는 저자의 프로필사진, 추천 리스트에 나오는 다른 사람의 프로필사진” 이 깨지지 않도록 하는 것입니다.
- 그리고 그것은 각각의 Resource 클래스에서 담당하고 있고, “파이썬 객체” 를 “JSON” 으로 바꿔 응답해주는 것을 담당하는 것은 “Schema” 입니다.
- 그 중에서 schema.user 의 AuthorSchema, UserSchema 들이 유저 한 명을 어떻게 JSON 으로 바꾸어 응답해주는지를 담당해주고 있죠?
- 그리고 잠시 복습을 하자면, “dump” 는 “파이썬 객체 -> json” 이었고, “load” 는 “json” -> “파이썬 객체” 였습니다.
그러면, 위의 흐름을 임시로 머릿속 메모리에 저장해두고 아래의 코드를 살펴봅시다.
api/schemas/user.py 의 UserSchema 클래스이고, 윗줄에 from marshmallow import validates_schema, post_dump 코드가 필요합니다!

먼저 19번 줄의 @post_dump 메서드는 어떤 역할을 할까요? post 가 붙어있는 것을 보아선 “dump 이후에 작동하는 것이 아닐까.. ?” 하는 생각이 드네요. 공식 문서에서는 아래와 같이 소개하고 있습니다.

개체를 직렬화한 후 호출할 메서드를 등록합니다. 메서드는 직렬화된 개체를 수신하고 처리된 개체를 반환합니다.
대충 우리의 추측이 맞았던 것으로 보이네요. “직렬화(dump) 후, 위의 데코레이터를 사용해 호출할 메서드를 등록하고, 해당 메서드는 직렬화된 개체를 받은 다음 적절한 처리를 한 후 반환한다” 로 이해하면 될 듯 싶습니다.

코드를 이해하기 위한 무기를 얻었으니 적을 다시한번 살펴봅시다. 아, 노란 박스 안에 있는 data 에 “직렬화된 객체” 가 들어가는 것이겠군요. 직렬화되었으므로 타입을 찍어 보면 파이썬의 딕셔너리가 출력되는 것을 확인할 수 있습니다.


그러면.. 대충 “사진 없는 게시물”, “사진 없는 프로필사진” 을 위한 “기본 사진들” 을 저장해 봅시다.

그렇게 하기 위해서, static 폴더 아래에 default 폴더를 하나 만들어주세요.
그리고 각각 아래의 사진들을 저장하겠습니다.
default_profile_img.png


그리고 default 파일들은 우리가 꼭 관리해야 하므로, .gitignore 파일을 아래와 같이 수정하겠습니다. 이미 static 이 있었다면, 그것을 주석 처리하고 “프로필 사진”, “게시물 사진” 만 버전 관리에서 빼도록 합시다.


위와 같이 “기본 이미지” 들은 버전 관리에 포함합시다.
기본 이미지들을 저장했으므로 스키마에서 그것을 이용할 수 있겠습니다. api/schemas/user.py 의 UserSchema 클래스에 아래의 코드를,
class UserSchema(ma.SQLAlchemyAutoSchema):
    image = String(required=True)
    created_at = fields.DateTime(format="%Y-%m-%d")

    @post_dump
    def set_default_image(self, data, **kwargs):
        if data["image"] == "" or data["image"] == None:
            data["image"] = "default/default_profile_img.png"
        return data

    class Meta:
        model = UserModel
        exclude = ("password",)
        # 읽기 전용 필드
        dump_only = ("email", "username")
AuthorSchema 에는 아래의 코드를 작성합니다.
class AuthorSchema(ma.SQLAlchemyAutoSchema):
    @post_dump
    def set_default_image(self, data, **kwargs):
        if data["image"] == "" or data["image"] == None:
            data["image"] = "default/default_profile_img.png"
        return data

    class Meta:
        model = UserModel
        exclude = (
            "password",
            "created_at",
            "email",
        )

그리고 브라우저에서 결과를 확인해 보세요. 프로필 사진이 깨지던 것이 잘 동작하는 것을 확인할 수 있죠? (데이터베이스에 프로필 사진이 저장되지 않은 경우는 저렇게 응답하여야 합니다.)

한 가지 예외에서 빠져나오지 못한 것은, 위의 “미미” 의 경우 데이터베이스에 사진 경로가 잘 저장되어 있죠? 하지만 백엔드 폴더에서 어떠한 이유로 그 사진이 존재하지 않는 경우는 역시 사진이 깨지게 될 겁니다. 이는 프론트엔드에서 처리하는 것이 좋아 보입니다. JS에 익숙하지 않아 그것을 처리하는 가이드를 작성하지 못하는 것이 정말 아쉽습니다만, 이는 독자들의 역할로 남겨두겠습니다. ㅠ_ㅠ
추천된 사람에 팔로우 요청 보내기

이번에는 위의 “팔로우” 버튼을 클릭하면 실제 해당 유저를 팔로우하도록 구현해 봅시다.
그렇게 하기 위해서는 우리가 백엔드에서 구현해 뒀던 “팔로우 API” 를 사용해야겠네요. 스펙을 다시 확인해 볼까요?
- PUT /users/{id}/followers/
- DELETE /users/{id}/followers/
여기서 중요한 건 “id” 를 얻어내야 한다는 겁니다. “어떤 유저를 팔로우할 거야?” 를 서버에 알려주는 것이죠!

그런데 우리가 작성한 위의 경우에는, 위의 경우를 본다면 “미미” 의 id 가 코드에 적혀있지 않습니다. 그것을 위에서 처리합시다. “팔로우” 버튼에 “미미” 의 id를 적어주고, 팔로우 버튼을 클릭하면 적혀있는 “미미” 의 id를 통해서 “나는 미미를 팔로우할래요~” 요청을 보내면 되겠네요!

id 정보를 “그려야 ” 하므로 post_list.js 의 loadRecommend 함수에 위의 코드를 작성합니다.


그러면 미미의 id 인 3이 버튼의 id 로 잘 추가된 것을 확인할 수 있네요!
다음으로 할 것은 follow 를 클릭하면 unfollow 로, 바뀐 unfollow 를 클릭하면 follow 로 바꿔주는 겁니다. 전에 처리했던 “좋아요” 기능과 비슷하죠?
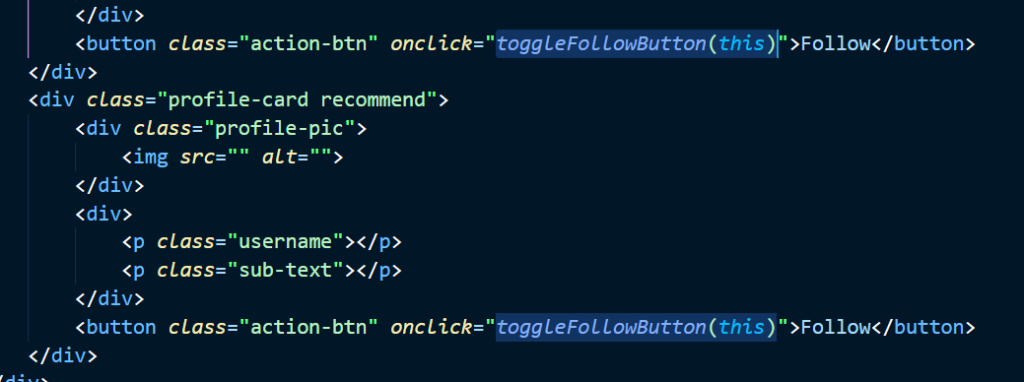
그러면, 버튼을 클릭할 때에 위와 같이 수행될 함수를 등록해주도록 합시다.
/**
 * 팔로우 & 언팔로우를 처리합니다.
 */
function toggleFollowButton(followButton) {
  console.log(followButton.id);
  if (followButton.innerHTML === "Follow") {
    followButton.innerHTML = "Unfollow";
  } else {
    followButton.innerHTML = "Follow";
  }
}
그리고 post_list.js 에 위의 함수를 작성합시다.


토글이 정상적으로 클릭할 때마다 잘 되는 것을 확인할 수 있네요!
이제 저 팔로우 버튼을 누르면 서버에 팔로우 요청을, 언팔로우 버튼을 누르면 언팔로우 요청을 보내도록 하면 되겠네요.

구현을 시작하기 위해서 요청을 보낼 서버의 URL 을 variables.js 에 위와 같이 정의해 줍시다.
/**
 * 팔로우 & 언팔로우를 처리합니다.
 */
function toggleFollowButton(followButton) {
  let id = followButton.id;
  if (followButton.innerHTML === "Follow") {
    // 팔로우 요청 보내기
    let myHeaders = new Headers();
    myHeaders.append("Authorization", `Bearer ${ACCESS_TOKEN}`);
    myHeaders.append("Content-Type", "application/json");
    var requestOptions = {
      method: "PUT",
      headers: myHeaders,
      redirect: "follow",
    };
    fetch(FOLLOW_API_URL(id), requestOptions)
      .then((response) => response.status)
      .catch((error) => console.log("error", error));
    followButton.innerHTML = "Unfollow";
    // 언팔로우 요청 보내기
  } else {
    let myHeaders = new Headers();
    myHeaders.append("Authorization", `Bearer ${ACCESS_TOKEN}`);
    myHeaders.append("Content-Type", "application/json");
    var requestOptions = {
      method: "DELETE",
      headers: myHeaders,
      redirect: "follow",
    };
    fetch(FOLLOW_API_URL(id), requestOptions)
      .then((response) => response.status)
      .catch((error) => console.log("error", error));
    followButton.innerHTML = "Follow";
  }
}
그리고 각각 PUT, DELETE 메서드를 사용해서 서버에 팔로우와 언팔로우 요청을 보내도록 로직을 추가합니다.

helloworld 유저 옆에 있는 follow 버튼을 누르면,

팔로우 요청이 성공적으로 이루어지고,

다시 unfollow 버튼을 누르면,

언팔로우 요청이 성공적으로 이루어진 것을 확인할 수 있네요! 좋습니다.
회원가입 구현하기
https://github.com/TGoddessana/flastagram/commit/16289d722cf9755b7073dd9906a309b61ceef7e8
회원가입의 경우 위의 커밋 내역을 참고하면 되겠습니다. 과제였지만, 혹시 구현이 힘드셨던 분들은 위의 과정을 이해해보세요!
지금까지의 모든 작업 내역은
https://github.com/TGoddessana/flastagram/commits/develop
에서 확인할 수 있습니다. :)
Backend 서버를 위한 postgresql 데이터베이스 서버 구축하기
이제 우리가 만든 flastagram 서비스를 전 세계에 선보일 시간입니다. 배포하는 방법에는 여러 가지가 있지만, 우리는 fly.io 서비스를 이용해 무료로 데이터베이스, 서버를 사용하겠습니다.
flyctl 이 이미 설치된 상태라고 가정합니다. 설치가 완료되었다면, flyctl version 명령어를 터미널에 입력했을 때에 아래와 같아야 합니다.

설치가 된 것을 확인했다면 아래의 명령어를 입력합니다.


그러면 브라우저가 열리거나 주소창이 제시되는데, 이곳에서 로그인을 완료합니다.

그 다음으로는 fly postgres create 명령어를 터미널에 입력합니다.

그리고 앱 이름을 입력합니다. 저는, flastagram-db 로 입력하겠습니다.

엔터를 누르면 지역을 선택합니다. 저는 일본 도쿄로 선택하겠습니다.

그러면 플랜을 선택합니다. 맨 위에 있는 Development 를 선택합니다. (무료이므로 이것을 선택해야 합니다!)
Creating postgres cluster in organization personal
Creating app…
Setting secrets on app flastagram-db…
Provisioning 1 of 1 machines with image flyio/postgres:14.4
Waiting for machine to start…
Machine 5683779b76458e is created
==> Monitoring health checks
Waiting for 5683779b76458e to become healthy (started, 3/3)

Postgres cluster flastagram-db created
Username: <유저이름>
Password: <비밀번호>
Hostname: flastagram-db.internal
Proxy port: 5432
Postgres port: 5433
Connection string: <>

Save your credentials in a secure place -- you won't be able to see them again!

Connect to postgres
Any app within the ingstor1092@gmail.com organization can connect to this Postgres using the following connection string:

Now that you've set up Postgres, here's what you need to understand: https://fly.io/docs/postgres/getting-started/what-you-should-know/
그러면 위의 메시지가 터미널에 나오며 성공적으로 postgres 앱이 생성되었다고 알려줄 겁니다.

주의사항, 위의 부분은 꼭 캡쳐를 떠 두던, 어디다 복사를 해 두던 해 주세요! 보고 치기가 복잡하니 어디에 텍스트로 복사해 두는 것을 적극 추천드립니다.
그리고 fly.io 의 dashboard 에 접근하면,
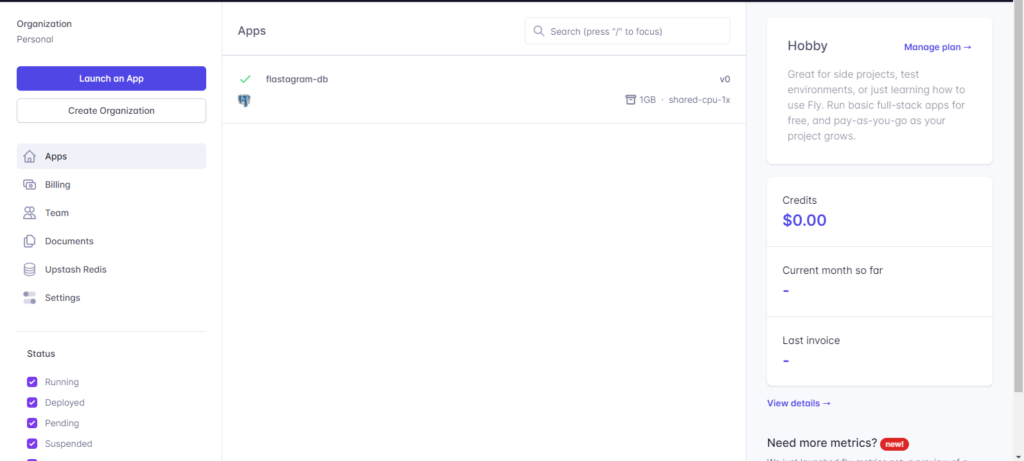
위와 같이 성공적으로 postgres 앱이 생성된 것을 확인할 수 있을 겁니다.

이제 위와 같이 터미널에 flyctl postgres connect -a <앱이름> 을 입력하면 우리의 데이터베이스 서버에 터미널로 연결할 수 있습니다.

위처럼 \du 를 입력하면 모든 Role 리스트를 확인할 수 있습니다. 이곳에서 우리가 사용할 flastagram 유저를 하나 생성합시다.

그리고 위의 명령어를 입력합니다. 빨간색 부분에서, 따옴표를 포함해서 ‘password’ 처럼 비밀번호를 입력하면 됩니다.

그리고 다시 \du 를 입력해보세요. 위와 같이 flastagram 유저가 새로 생성된 것을 확인할 수 있을 겁니다.

이제 그것을 우리의 flastagram 에서 연결해봅시다. 배포를 위해서 backend/config/dev.py 에서, 위의 드래그한 부분을 모두config/common.py 로 옮겨 주겠습니다.
from datetime import timedelta
import os


JSON_AS_ASCII = False
JWT_ACCESS_TOKEN_EXPIRES = timedelta(days=1)
JWT_REFRESH_TOKEN_EXPIRES = timedelta(days=30)

BASE_DIR = os.path.dirname(os.path.dirname(__file__))
UPLOADED_IMAGES_DEST = os.path.join(BASE_DIR, "static", "images")

SQLALCHEMY_TRACK_MODIFICATIONS = False
PROPAGATE_EXCEPTIONS = True
JWT_SECRET_KEY = os.environ["JWT_SECRET_KEY"]
SECRET_KEY = os.environ["APP_SECRET_KEY"]
JWT_BLACKLIST_ENABLED = True
JWT_BLACKLIST_TOKEN_CHECKS = ["access", "refresh"]
from config.common import *

DEBUG = True
SQLALCHEMY_DATABASE_URI = "sqlite:///{}".format(
    os.path.join(BASE_DIR, "flastagram.db")
)
그러면 데이터베이스를 이제는 sqlite 가 아닌 flastagram-db 를 사용할 것이므로, backend/config/prod.py 에 아래의 내용을 입력해 줍니다. 이전에 캡쳐해 두었던 비밀번호를 빨간색 부분에 그대로 입력해주면 됩니다. 대신, 앞 부분에 postgres 가 아닌 postgresql 로 꼭 변경하여 입력해 주세요! 아래의 문자로 시작해야 합니다.

그리고, .env 파일에서 아래와 같이 APPLICATION SETTINGS 환경 변수 값을 변경합니다. 개발용이 아닌, 실서비스 용으로 배포할 거니까요!

그리고, postgresql 에 연결하기 위해서 아래의 모듈을 추가로 설치하겠습니다. requirements/prod.txt 에 아래의 내용을 입력합니다.

pip install -r requirements/prod.txt 를 입력하여 위의 모듈을 설치해 주겠습니다!

다음으로는 우리의 앱에서 postgresql 데이터베이스에 접속하기 위하여 프록시 설정을 해 주겠습니다. fly proxy 5432 -a flastagram-db 을 터미널에 입력합니다.

위에서 한 것은 무엇일까요? 리눅스 환경에서 ( 혹은 powershell 에서) 프록시 설정을 하기 전 netstat -ntlp 를 입력해 보겠습니다. (저는 우분투 환경을 사용하고 있습니다, powershell 혹은 cmd 에서는 다른 명령어를 입력해야 합니다.)


그리고 프록시 설정을 한 후 같은 명령어를 입력했습니다. 3번째 줄에, 뭔가 새로운 줄이 생겼네요.
위에서 한 건 대체 무엇인가?
netstat 명령어는 network statistics 를 뜻하는 명령어로, netstat는 전송 제어 프로토콜, 라우팅 테이블, 수많은 네트워크 인터페이스, 네트워크 프로토콜 통계를 위한 네트워크 연결을 보여주는 명령 줄 도구이다. ..라고 https://ko.wikipedia.org/wiki/Netstat 에 소개되어 있습니다.

위의 사진에서 맨 마지막 줄을 봅시다.
- Proto 는 tcp,
- Local Address 는 127.0.0.1:5432
- Foreign Address 는 0.0.0.0:* 으로 적혀 있고,
- State는 Listen 상태네요.
먼저 Proto 는 아래의 tcp 라는 글자를 보고 예측하셨겠지만 프로토콜을 나타냅니다. 프로토콜은 MDN 에 아래와 같이 소개되어 있네요.
TCP

간단히 “내가 이렇게 말하면 이런 뜻이야~! 이렇게 알아들으렴!” 을 미리 정해둔 것을 프로토콜이라고 합니다. 뭔지 하나도 모르겠지만, “일단 TCP 프로토콜을 사용하는구나!” 를 머릿속에 두고 다음 단계로 넘어갑시다.
Local Address, 127.0.0.1:5432
다음으로 보이는 Local Address 의 값인 127.0.0.1:5432를 살펴보겠습니다. 이는 우리가 플라스크 애플리케이션을 로컬 서버에서 구동시킨 후 브라우저를 열어 접속할 때 수없이 보았던 숫자이기도 하죠. 그것은 “자신의 컴퓨터의 IP 주소” 를 의미합니다.
생각해보면 조금은~ 이상합니다. 우리는 IP주소가 컴퓨터 네트워크에서 장치들이 서로를 인식하고 통신을 하기 위해서 사용하는 특수한 번호 임을 알고 있기 때문입니다. 이는 마치 ‘모든 사람들의 이름이 “나” 면 저 사람을 대체 뭐라고 불러야 하지?’ 와 유사합니다. 어째, 글을 읽으면 읽을수록 주제에서는 멀어져 가는, 사공은 한 명이지만 배가 급속도로 산으로 가는 느낌이지만..,
IP 주소라는 말은 굉장히 익숙하실 겁니다. 어쩌면 일상생활에서 굉장히.. 까지는 아니더라도 종종 사용되는 단어..(맞죠?) 입니다. 먼저 IP 란 인터넷 프로토콜 (Internet Protocol) 의 약자이고, 그것은 송신 호스트와 수신 호스트가 패킷 교환 네트워크(패킷 스위칭 네트워크, Packet Switching Network)에서 정보를 주고받는 데 사용하는 정보 위주의 규약(프로토콜, Protocol) 을 의미합니다.
그리고 IP (IP주소와는 다른) 에는 2가지의 버전이 가장 많이 쓰이고 있습니다. IPv4, IPv6 이 바로 그것들입니다.
IPv4 는 IP 의 네 번째 버전인데, 127.0.0.1 은 IPv4 에서 자기 자신을 가리키기 위해 예약된 IP 주소를 나타냅니다. 그리고 이를 loopback 주소라고도 하지요. 동일한 머신으로 loop back 된다는 의미이기도 합니다. 아무튼,
결국 위의 사진에서 우리가 알 수 있는 것은, “자신의 컴퓨터” 가, “TCP 프로토콜을 사용해서 통신을 하고 있다” 까지 해석이 된 것 같아요.
Foreign Address, 0.0.0.0:*
Foreign Address 는 내 컴퓨터 (Local Address) 와 연결된 다른 컴퓨터를 나타냅니다. 0.0.0.0 은 IPv4 주소 체계의 모든 주소를 나타냅니다. 0.0.0.0:* 이고 “listen” 상태이므로 “현재 내 컴퓨터가, 모든 IP의, 모든 포트로부터 요청을 기다리고 있다”는 것을 의미하고 있겠네요.
그래서 한 게 뭐라는 건데? – proxy
좋아요. 프록시 설정을 하니까 netstat 명령어에서 뭐가 생겼고, 뭐가 추가로 동작하고 있다는 건 알겠습니다. 그리고 추가로 동작하던 그것은 5432 포트가 연결 요청을 기다리고 있는 거였죠. 그런데 대체 왜 이걸 했냐는 겁니다.
앞서 지금까지 개발용으로 우리는 SQLite 를 사용해 왔고, 그것은 실서비스 환경에서 사용하기에 적절하지 않다고 했었죠? 그것은 SQLite가 어떻게 동작하는가에 대해 관련이 있습니다.
SQLite가 아닌, Oracle, Mysql, Postgresql 과 같은 데이터베이스들은 클라이언트-서버 아키텍처를 기반으로 동작합니다.
oracle의 경우에도,

MySQL 의 경우에도,

PostgreSQL 의 경우에도 모두 공식 문서를 확인해보면 클라이언트-서버 아키텍쳐로 동작한다고 소개하고 있습니다.

위의 문서를 읽어 보지 않더라도 – 혹시라도 다른 수업에서, mysql 혹은 oracle 과 같은 데이터베이스를 사용해 보신 분들은 아실 겁니다. 데이터베이스 서버를 열고, 그 데이터베이스와 내 어플리케이션을 연결해야 데이터베이스를 사용할 수 있었습니다. postgresql 또한 데이터베이스 서버를 열어야지만 그것을 사용할 수 있습니다. 클라이언트에서 그리고 실제 데이터들은 postgresql 데이터베이스 서버의 아래 위치에 저장됩니다.

반면 – SQlite 가 동작하는 것은 위의 것들과 다릅니다. 우리가 데이터베이스에 무언가를 저장하기 위해서 별도의 데이터베이스 서버를 열었던가요? – 혹은 미리 동작하는 서버에 무언가 연결하는 과정을 거쳤나요? 그렇지 않았습니다. 데이터베이스의 모든 정보는 flastagram.db와 같은 하나의 파일에 모두 저장되어 있었죠?

이는 SQLite 가 클라이언트/서버 구조가 아닌 서버리스 구조로 이루어졌기 때문입니다. 공식 문서에서는 그것에 대해 아래와 같이 소개하고 있습니다.

With SQLite, the process that wants to access the database reads and writes directly from the database files on disk. There is no intermediary server process.
https://www.sqlite.org/serverless.html
SQLite를 사용하면 데이터베이스에 액세스하려는 프로세스가 디스크의 데이터베이스 파일에서 직접 읽고 씁니다. 중간 서버 프로세스가 없습니다.
그 두 개의 차이를 그림으로 나타내 본다면 아래와 같습니다.
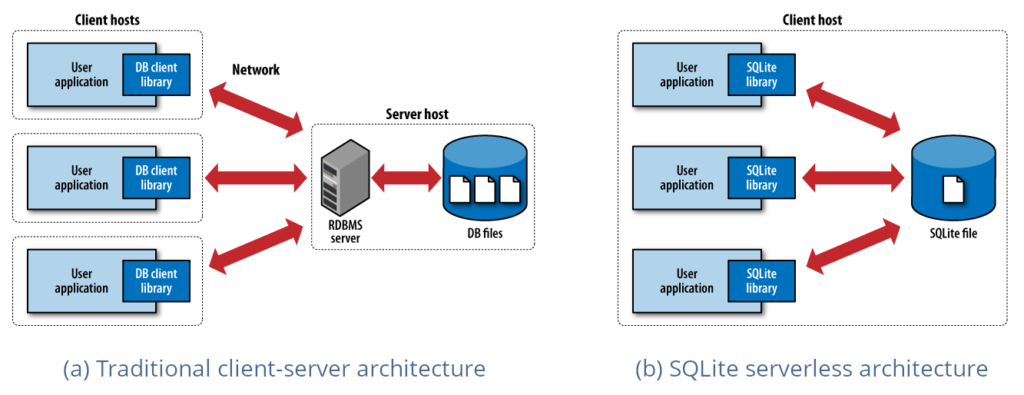
그리고 우리는 fly.io 에서 별도의 postgresql 앱을 하나 만들었습니다. 이는 우리가 기존의 SQLite 에서 사용했던 “파일을 직접 읽고 쓰기” 에서, “데이터베이스 서버에 요청을 보내고, 서버가 데이터 파일을 다루도록 하기” 로 바꾼다는 것을 의미하겠죠?

그리고 PostgreSQL은 아래의 공식 문서 소개와 같이 TCP/IP, 혹은 Unix 도메인 소켓 프로토콜을 지원합니다.

그러면, 그러면. 데이터베이스 URL 을 알고 있다면 아래와 같이 데이터베이스 URL을 직접 config 에 집어넣는 방식으로 사용할 수 있지 않을까? 하는 생각이 들 겁니다. 실제로 저는 pythonanywhere 에서 mysql 서버를 열었고, 해당 데이터베이스 서버의 URL 을 DB URL에 작성하여 연결했던 적이 있었고 실제로 작동했습니다.

그런데 우리가 사용하는 fly.io postgres 앱의 경우에는 위와 같이 URL을 직접 입력하면 안 된다는 겁니다.
문제는 왜인지.. 파악할 수가 없었다는 겁니다. 그 중 유의미한 답변은 아래와 같았는데,
- https://community.fly.io/t/cant-connect-to-my-database/4148
- https://fly.io/docs/reference/private-networking/
프록시를 이용하는 것이었습니다.

우리의 컴퓨터는 우리가 생성한 postgresql fly.io 앱으로부터 요청을 받고, 그것을 5432포트로 열어놓고 있을 겁니다. fly.io 에서 소개하는 proxy 의 사용방법은 아래와 같습니다.

연결이 잘 되었나 확인해 볼까요? 먼저, 백엔드 서버를 로컬에서 열겠습니다.


그리고 위와 같이 flask shell 을 열어서 “지금 데이터베이스에 존재하는 모든 유저를 가져와!” 를 명령해 봅시다. 아마 에러가 날 겁니다.

유저 테이블이 존재하지 않기 때문입니다.
이번엔 이걸 해결합시다.
데이터베이스 연결하기

먼저 위의 명령어를 입력해서 postgres 앱에 접속합니다.

위에서 확인했다시피, \du 명령어를 입력하면 전체 유저 목록을 확인할 수 있습니다. 지금은 posgres 라는 유저로 데이터베이스와 연결하고 있는데, 대신 우리가 만들어두었던 flastagram 유저로 로그인하겠습니다.

연결을 끊어준 후,

위와 같이 명령어를 입력하여 우리가 만들어준 유저로 로그인합시다.
그리고 실제로 사용하기 위한 데이터베이스를 하나 만들어주겠습니다. \l 을 입력하면, 데이터베이스 목록을 확인할 수 있습니다.


그리고 위와 같이, CREATE DATABASE flastagram_core_db; 를 입력하여 데이터베이스를 하나 만들겠습니다.

다시 \l 을 입력하면, 위와 같이 flastagram_core_db 라는 이름의 데이터베이스가, 로그인한 유저인 flastagram 으로 되어 있는 것을 확인할 수 있네요!
좋아요. 이제 데이터베이스를 사용할 사용자, 사용할 데이터베이스까지 만들어졌습니다. 아래의 것들을 기억해둡니다.
- 유저 이름 : flastagram
- 유저 비밀번호 : 각자 다르게..
- 데이터베이스 이름 : flastagram-db

그리고, 새로 .env 파일에 위와 같이 DATABASE_URL_FOR_PRODUCTION 이라는 값을 입력합니다. 가려진 부분에는 각각의 비밀번호를 작성해주시면 됩니다. 데이터베이스 연결 정보는 코드로 공개되면 안 되니, 환경 변수로 값을 지정합니다.
그리고, config/prod.py 에는 아래와 같이 값을 변경합니다.

이제 적절한 유저, 적절한 데이터베이스에 연결되었으니 테이블을 만들어줍시다. flask db upgrade 를 입력합니다.

그럼 데이터베이스에 접속해서 테이블이 잘 생성되었는지 확인해 봅시다.

위처럼 접속을 완료한 후, SELECT * FROM pg_catalog.pg_tables where schemaname = ‘public’; 명령어를 입력하여 테이블이 잘 만들어졌는지 확인해 봅시다. 아래처럼, 우리가 작성한 테이블들이 모두 잘 나열되어 있네요!


이제는 flask shell 에서 유저 목록을 조회하면 [] 비어 있다는 메시지를 잘 보여주네요..!
https://github.com/TGoddessana/flastagram/commit/bb8f6e18b1490c0a092b67216e953b69f33bd0ec
관련 작업 커밋은 위를 참고하시면 되겠습니다!
on-premise VS Cloud and Docker
이제 진짜 우리의 flastagram 앱을 fly.io 서비스에 배포하겠습니다. 당연히 “왜 다른 서비스를 이용해서 배포를 해야 해? 그냥 내 컴퓨터로 서버 열면 안 돼?” 를 생각하신다면 “내 집에 있는 컴퓨터를 계속 켜놓지 않더라도, 언제든 사람들이 이용할 수 있도록 하기 위해서!” 가 되겠습니다. 당연히, 지금 상태에서도 로컬 컴퓨터에 Nginx와 Uwsgi를 설치한 후 사람들에게 공개할 수 있습니다. 이를 온 프레미스라고도 합니다. AWS와 같은 서비스를 이용하지 않고, 사내에 직접 서버를 설치하는 방식이죠.

– 하지만 우리의 경우 가정집에서 서비스를 이용해 컴퓨터 하나를 24시간 내내 켜 놓는 것은 꽤 부담됩니다. 그래서 우리는, 클라우드 컴퓨팅 서비스를 이용할 겁니다. 누군가가 컴퓨터를 켜 놓고, “이거 쓰는 대신, 얼마를 지불해!” 라고 하는 것이죠. 다행히 우리가 쓸 fly.io 서비스는 일정 자원 안에서 그것을 무료로 제공합니다.
좋아요. 어디선가 컴퓨터를 켜 두고 있고, 우리는 그것을 이용할 것이라는 걸 알게 되었습니다. 그러면 우리 컴퓨터에 설치되어 있는 flastagram 을 그곳에서 동일하게 사용할 수 있도록 하려면 어떤 과정이 필요할까요?
먼저 생각나는 것은 당연히 Python3 이 구동 가능해야 한다는 겁니다. python 기반으로 작성된 웹 프레임워크이고, 우리의 코드도 그것들로 작성되어 있죠. Python 자체가 설치되어 있지 않다면 큰 낭패입니다.
그 다음으로 생각나는 것은 Flask를 비롯한 flask-restful, flask-jwt-extended 와 같은 Python 확장들이 모두 설치되어 있어야 한다는 겁니다. Flask를 웹 프레임워크로 사용하고 있는데 그것을 깔지 못한다면 큰일나겠죠.
여기서 또 고려해야 할 것은 – Python 의 버전에도 민감할 수 있으므로 그것도 생각해보아야 합니다. 어떤 라이브러리는 Python 3.9 까지, 어떤 라이브러리들은 Python 3.11까지 지원되는 상황에서 우리가 사용하려는 클라우드 컴퓨터에 Python 3.11 만 설치되어 있다면 큰일일 겁니다.
우리는 압니다. 우리의 로컬 컴퓨터에서 플라스크 서버가 잘 동작하고 있다는 것을요. 현재 저는 Windows 환경에서 개발을 진행해 왔고, Python 은 3.10 을 사용하고 있습니다. 생각해보면, 그냥 클라우드 컴퓨터에서 windows 를 설치한 다음, 그곳에 내가 작업해 둔 모든 것들을 그대로 옮겨두면 잘 작동할 것 같아 보여요.
- 보통 서버 운영체제로는 Ubuntu 를 많이 사용하는데,
- 그곳에 다른 운영체제를 사용할 수 있도록 하는 VMWare와 같은 프로그램을 설치한 다음,
- 윈도우를 설치하고,
- Python 을 설치하고,
- Python 가상 환경에 필요한 모든 라이브러리들을 설치하고,
- 우리의 플라스크 앱을 모두 옮겨두면 작동하겠네요!
그런데.. 그런데요. 굳이 우리의 앱을 실행하기 위해서 윈도우 전체가 필요할까요? 여러분이 만약에 MacOS에서 작업을 수행하셨다면, MacOS 전체가 필요할까요? 여러분이 만약세 Ubuntu에서 작업을 수행하셨다면, OS 전체가 굳이 필요할까요? 딱 우리의 앱을 필요한 것들만 골라서 사진 찍어두듯이 찍어둔 다음 클라우드에서 실행할 수 없을까요..?
Docker 는 그것을 수행할 수 있는 가장 유명한 툴입니다. 현재 각각의 환경에서 수행되고 있는 것들을, 사진 찍듯이 찰칵 찍어 컨테이너라는 곳에서 실행할 수 있죠. 도커 공식 홈페이지에서는 컨테이너를 아래와 같이 소개합니다.

컨테이너는 애플리케이션이 한 컴퓨팅 환경에서 다른 컴퓨팅 환경으로 빠르고 안정적으로 실행되도록 코드와 모든 종속성을 패키징하는 소프트웨어의 표준 단위입니다.
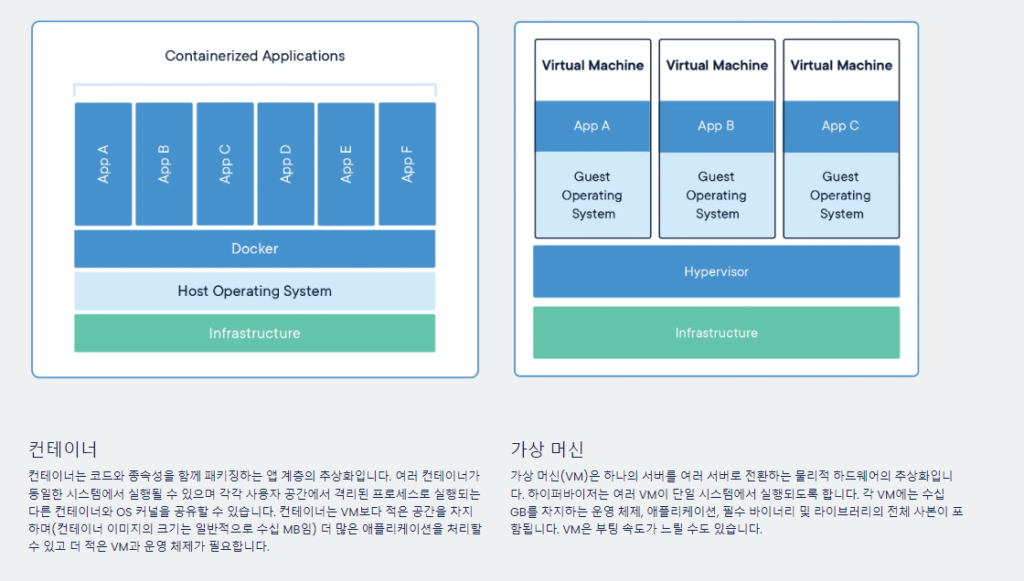
대충 왜 사용하는지는 알았으니, 우리의 앱을 도커 컨테이너로 바꿔 봅시다. 우리는 NginX를 웹 서버로 사용하고, uwsgi 를 이용해서 우리의 파이썬 앱과 소통할 수 있도록 하겠습니다.
그것의 시작은 Dockerfile 입니다. 그곳에, “내 앱에는 파이썬, 플라스크, 어쩌구 저쩌구가 필요해..” 를 모두 담아두는 것이죠. Docker는 그것들을 기반으로 이미지를 찰칵 찍어 저장해둘 겁니다.
사전 작업
우리는 앞서 필요한 파이썬 패키지들, 설치해야 하는 Python 패키지들을 requirements.txt 에 담아 저장했습니다. 그런데 그 중 Flask-Uploads 는 마지막 커밋이 2년 지난 – 더이상 유지보수되지 않는 패키지인 듯 합니다.
Flask는 버전이 최근에 2.2로 업데이트되며 필요한 werkzeug 버전도 2.2 이상이 되었습니다. 그것 때문에 werkzeug 디렉토리 구조가 바뀌었고, 우리의 환경에서는 제대로 동작하지 않았습니다. 그것을 고쳐야 합니다. (물론 우리는 – venv/ 아래의 파일을 직접 수정해서 문제를 해결했었습니다.)
이것을 하는 이유는 우리가 종속성 패키지를 설치하려고 할 때에 requirements.txt 기반으로 설치하기 때문입니다. 그러한 경우 venv 파일은 우리가 수정한 버전이 아닌, pypi 에 업로드된 (더이상 유지보수되지 않는)버전이 올라오게 됩니다.

위와 같이 backend/ 아래에 utils 폴더를 만들고,
# -*- coding: utf-8 -*-
"""
flaskext.uploads
================
This module provides upload support for Flask. The basic pattern is to set up
an `UploadSet` object and upload your files to it.

:copyright: 2010 Matthew "LeafStorm" Frazier
:license:   MIT/X11, see LICENSE for details
"""

import sys

PY3 = sys.version_info[0] == 3

if PY3:
    string_types = (str,)
else:
    string_types = (basestring,)

import os.path
import posixpath

from flask import current_app, send_from_directory, abort, url_for
from itertools import chain
from werkzeug.datastructures import FileStorage
from werkzeug.utils import secure_filename

from flask import Blueprint

# Extension presets

#: This just contains plain text files (.txt).
TEXT = ("txt",)

#: This contains various office document formats (.rtf, .odf, .ods, .gnumeric,
#: .abw, .doc, .docx, .xls, and .xlsx). Note that the macro-enabled versions
#: of Microsoft Office 2007 files are not included.
DOCUMENTS = tuple("rtf odf ods gnumeric abw doc docx xls xlsx".split())

#: This contains basic image types that are viewable from most browsers (.jpg,
#: .jpe, .jpeg, .png, .gif, .svg, and .bmp).
IMAGES = tuple("jpg jpe jpeg png gif svg bmp".split())

#: This contains audio file types (.wav, .mp3, .aac, .ogg, .oga, and .flac).
AUDIO = tuple("wav mp3 aac ogg oga flac".split())

#: This is for structured data files (.csv, .ini, .json, .plist, .xml, .yaml,
#: and .yml).
DATA = tuple("csv ini json plist xml yaml yml".split())

#: This contains various types of scripts (.js, .php, .pl, .py .rb, and .sh).
#: If your Web server has PHP installed and set to auto-run, you might want to
#: add ``php`` to the DENY setting.
SCRIPTS = tuple("js php pl py rb sh".split())

#: This contains archive and compression formats (.gz, .bz2, .zip, .tar,
#: .tgz, .txz, and .7z).
ARCHIVES = tuple("gz bz2 zip tar tgz txz 7z".split())

#: This contains shared libraries and executable files (.so, .exe and .dll).
#: Most of the time, you will not want to allow this - it's better suited for
#: use with `AllExcept`.
EXECUTABLES = tuple("so exe dll".split())

#: The default allowed extensions - `TEXT`, `DOCUMENTS`, `DATA`, and `IMAGES`.
DEFAULTS = TEXT + DOCUMENTS + IMAGES + DATA


class UploadNotAllowed(Exception):
    """
    This exception is raised if the upload was not allowed. You should catch
    it in your view code and display an appropriate message to the user.
    """


def tuple_from(*iters):
    return tuple(itertools.chain(*iters))


def extension(filename):
    ext = os.path.splitext(filename)[1]
    if ext.startswith("."):
        # os.path.splitext retains . separator
        ext = ext[1:]
    return ext


def lowercase_ext(filename):
    """
    This is a helper used by UploadSet.save to provide lowercase extensions for
    all processed files, to compare with configured extensions in the same
    case.

    .. versionchanged:: 0.1.4
       Filenames without extensions are no longer lowercased, only the
       extension is returned in lowercase, if an extension exists.

    :param filename: The filename to ensure has a lowercase extension.
    """
    if "." in filename:
        main, ext = os.path.splitext(filename)
        return main + ext.lower()
    # For consistency with os.path.splitext,
    # do not treat a filename without an extension as an extension.
    # That is, do not return filename.lower().
    return filename


def addslash(url):
    if url.endswith("/"):
        return url
    return url + "/"


def patch_request_class(app, size=64 * 1024 * 1024):
    """
    By default, Flask will accept uploads to an arbitrary size. While Werkzeug
    switches uploads from memory to a temporary file when they hit 500 KiB,
    it's still possible for someone to overload your disk space with a
    gigantic file.

    This patches the app's request class's
    `~werkzeug.BaseRequest.max_content_length` attribute so that any upload
    larger than the given size is rejected with an HTTP error.

    .. note::

       In Flask 0.6, you can do this by setting the `MAX_CONTENT_LENGTH`
       setting, without patching the request class. To emulate this behavior,
       you can pass `None` as the size (you must pass it explicitly). That is
       the best way to call this function, as it won't break the Flask 0.6
       functionality if it exists.

    .. versionchanged:: 0.1.1

    :param app: The app to patch the request class of.
    :param size: The maximum size to accept, in bytes. The default is 64 MiB.
                 If it is `None`, the app's `MAX_CONTENT_LENGTH` configuration
                 setting will be used to patch.
    """
    if size is None:
        if isinstance(
            app.request_class.__dict__["max_content_length"], property
        ):
            return
        size = app.config.get("MAX_CONTENT_LENGTH")
    reqclass = app.request_class
    patched = type(
        reqclass.__name__, (reqclass,), {"max_content_length": size}
    )
    app.request_class = patched


def config_for_set(uset, app, defaults=None):
    """
    This is a helper function for `configure_uploads` that extracts the
    configuration for a single set.

    :param uset: The upload set.
    :param app: The app to load the configuration from.
    :param defaults: A dict with keys `url` and `dest` from the
                     `UPLOADS_DEFAULT_DEST` and `DEFAULT_UPLOADS_URL`
                     settings.
    """
    config = app.config
    prefix = "UPLOADED_%s_" % uset.name.upper()
    using_defaults = False
    if defaults is None:
        defaults = dict(dest=None, url=None)

    allow_extns = tuple(config.get(prefix + "ALLOW", ()))
    deny_extns = tuple(config.get(prefix + "DENY", ()))
    destination = config.get(prefix + "DEST")
    base_url = config.get(prefix + "URL")

    if destination is None:
        # the upload set's destination wasn't given
        if uset.default_dest:
            # use the "default_dest" callable
            destination = uset.default_dest(app)
        if destination is None:  # still
            # use the default dest from the config
            if defaults["dest"] is not None:
                using_defaults = True
                destination = os.path.join(defaults["dest"], uset.name)
            else:
                raise RuntimeError("no destination for set %s" % uset.name)

    if base_url is None and using_defaults and defaults["url"]:
        base_url = addslash(defaults["url"]) + uset.name + "/"

    return UploadConfiguration(destination, base_url, allow_extns, deny_extns)


def configure_uploads(app, upload_sets):
    """
    Call this after the app has been configured. It will go through all the
    upload sets, get their configuration, and store the configuration on the
    app. It will also register the uploads module if it hasn't been set. This
    can be called multiple times with different upload sets.

    .. versionchanged:: 0.1.3
       The uploads module/blueprint will only be registered if it is needed
       to serve the upload sets.

    :param app: The `~flask.Flask` instance to get the configuration from.
    :param upload_sets: The `UploadSet` instances to configure.
    """
    if isinstance(upload_sets, UploadSet):
        upload_sets = (upload_sets,)

    if not hasattr(app, "upload_set_config"):
        app.upload_set_config = {}
    set_config = app.upload_set_config
    defaults = dict(
        dest=app.config.get("UPLOADS_DEFAULT_DEST"),
        url=app.config.get("UPLOADS_DEFAULT_URL"),
    )

    for uset in upload_sets:
        config = config_for_set(uset, app, defaults)
        set_config[uset.name] = config

    should_serve = any(s.base_url is None for s in set_config.values())
    if "_uploads" not in app.blueprints and should_serve:
        app.register_blueprint(uploads_mod)


class All(object):
    """
    This type can be used to allow all extensions. There is a predefined
    instance named `ALL`.
    """

    def __contains__(self, item):
        return True


#: This "contains" all items. You can use it to allow all extensions to be
#: uploaded.
ALL = All()


class AllExcept(object):
    """
    This can be used to allow all file types except certain ones. For example,
    to ban .exe and .iso files, pass::

        AllExcept(('exe', 'iso'))

    to the `UploadSet` constructor as `extensions`. You can use any container,
    for example::

        AllExcept(SCRIPTS + EXECUTABLES)
    """

    def __init__(self, items):
        self.items = items

    def __contains__(self, item):
        return item not in self.items


class UploadConfiguration(object):
    """
    This holds the configuration for a single `UploadSet`. The constructor's
    arguments are also the attributes.

    :param destination: The directory to save files to.
    :param base_url: The URL (ending with a /) that files can be downloaded
                     from. If this is `None`, Flask-Uploads will serve the
                     files itself.
    :param allow: A list of extensions to allow, even if they're not in the
                  `UploadSet` extensions list.
    :param deny: A list of extensions to deny, even if they are in the
                 `UploadSet` extensions list.
    """

    def __init__(self, destination, base_url=None, allow=(), deny=()):
        self.destination = destination
        self.base_url = base_url
        self.allow = allow
        self.deny = deny

    @property
    def tuple(self):
        return (self.destination, self.base_url, self.allow, self.deny)

    def __eq__(self, other):
        return self.tuple == other.tuple


class UploadSet(object):
    """
    This represents a single set of uploaded files. Each upload set is
    independent of the others. This can be reused across multiple application
    instances, as all configuration is stored on the application object itself
    and found with `flask.current_app`.

    :param name: The name of this upload set. It defaults to ``files``, but
                 you can pick any alphanumeric name you want. (For simplicity,
                 it's best to use a plural noun.)
    :param extensions: The extensions to allow uploading in this set. The
                       easiest way to do this is to add together the extension
                       presets (for example, ``TEXT + DOCUMENTS + IMAGES``).
                       It can be overridden by the configuration with the
                       `UPLOADED_X_ALLOW` and `UPLOADED_X_DENY` configuration
                       parameters. The default is `DEFAULTS`.
    :param default_dest: If given, this should be a callable. If you call it
                         with the app, it should return the default upload
                         destination path for that app.
    """

    def __init__(self, name="files", extensions=DEFAULTS, default_dest=None):
        if not name.isalnum():
            raise ValueError("Name must be alphanumeric (no underscores)")
        self.name = name
        self.extensions = extensions
        self._config = None
        self.default_dest = default_dest

    @property
    def config(self):
        """
        This gets the current configuration. By default, it looks up the
        current application and gets the configuration from there. But if you
        don't want to go to the full effort of setting an application, or it's
        otherwise outside of a request context, set the `_config` attribute to
        an `UploadConfiguration` instance, then set it back to `None` when
        you're done.
        """
        if self._config is not None:
            return self._config
        try:
            return current_app.upload_set_config[self.name]
        except AttributeError:
            raise RuntimeError("cannot access configuration outside request")

    def url(self, filename):
        """
        This function gets the URL a file uploaded to this set would be
        accessed at. It doesn't check whether said file exists.

        :param filename: The filename to return the URL for.
        """
        base = self.config.base_url
        if base is None:
            return url_for(
                "_uploads.uploaded_file",
                setname=self.name,
                filename=filename,
                _external=True,
            )
        else:
            return base + filename

    def path(self, filename, folder=None):
        """
        This returns the absolute path of a file uploaded to this set. It
        doesn't actually check whether said file exists.

        :param filename: The filename to return the path for.
        :param folder: The subfolder within the upload set previously used
                       to save to.
        """
        if folder is not None:
            target_folder = os.path.join(self.config.destination, folder)
        else:
            target_folder = self.config.destination
        return os.path.join(target_folder, filename)

    def file_allowed(self, storage, basename):
        """
        This tells whether a file is allowed. It should return `True` if the
        given `werkzeug.FileStorage` object can be saved with the given
        basename, and `False` if it can't. The default implementation just
        checks the extension, so you can override this if you want.

        :param storage: The `werkzeug.FileStorage` to check.
        :param basename: The basename it will be saved under.
        """
        return self.extension_allowed(extension(basename))

    def extension_allowed(self, ext):
        """
        This determines whether a specific extension is allowed. It is called
        by `file_allowed`, so if you override that but still want to check
        extensions, call back into this.

        :param ext: The extension to check, without the dot.
        """
        return (ext in self.config.allow) or (
            ext in self.extensions and ext not in self.config.deny
        )

    def get_basename(self, filename):
        return lowercase_ext(secure_filename(filename))

    def save(self, storage, folder=None, name=None):
        """
        This saves a `werkzeug.FileStorage` into this upload set. If the
        upload is not allowed, an `UploadNotAllowed` error will be raised.
        Otherwise, the file will be saved and its name (including the folder)
        will be returned.

        :param storage: The uploaded file to save.
        :param folder: The subfolder within the upload set to save to.
        :param name: The name to save the file as. If it ends with a dot, the
                     file's extension will be appended to the end. (If you
                     are using `name`, you can include the folder in the
                     `name` instead of explicitly using `folder`, i.e.
                     ``uset.save(file, name="someguy/photo_123.")``
        """
        if not isinstance(storage, FileStorage):
            raise TypeError("storage must be a werkzeug.FileStorage")

        if folder is None and name is not None and "/" in name:
            folder, name = os.path.split(name)

        basename = self.get_basename(storage.filename)
        if name:
            if name.endswith("."):
                basename = name + extension(basename)
            else:
                basename = name

        if not self.file_allowed(storage, basename):
            raise UploadNotAllowed()

        if folder:
            target_folder = os.path.join(self.config.destination, folder)
        else:
            target_folder = self.config.destination
        if not os.path.exists(target_folder):
            os.makedirs(target_folder)
        if os.path.exists(os.path.join(target_folder, basename)):
            basename = self.resolve_conflict(target_folder, basename)

        target = os.path.join(target_folder, basename)
        storage.save(target)
        if folder:
            return posixpath.join(folder, basename)
        else:
            return basename

    def resolve_conflict(self, target_folder, basename):
        """
        If a file with the selected name already exists in the target folder,
        this method is called to resolve the conflict. It should return a new
        basename for the file.

        The default implementation splits the name and extension and adds a
        suffix to the name consisting of an underscore and a number, and tries
        that until it finds one that doesn't exist.

        :param target_folder: The absolute path to the target.
        :param basename: The file's original basename.
        """
        name, ext = os.path.splitext(basename)
        count = 0
        while True:
            count = count + 1
            newname = "%s_%d%s" % (name, count, ext)
            if not os.path.exists(os.path.join(target_folder, newname)):
                return newname


uploads_mod = Blueprint("_uploads", __name__, url_prefix="/_uploads")


@uploads_mod.route("/<setname>/<path:filename>")
def uploaded_file(setname, filename):
    config = current_app.upload_set_config.get(setname)
    if config is None:
        abort(404)
    return send_from_directory(config.destination, filename)


class TestingFileStorage(FileStorage):
    """
    This is a helper for testing upload behavior in your application. You
    can manually create it, and its save method is overloaded to set `saved`
    to the name of the file it was saved to. All of these parameters are
    optional, so only bother setting the ones relevant to your application.

    :param stream: A stream. The default is an empty stream.
    :param filename: The filename uploaded from the client. The default is the
                     stream's name.
    :param name: The name of the form field it was loaded from. The default is
                 `None`.
    :param content_type: The content type it was uploaded as. The default is
                         ``application/octet-stream``.
    :param content_length: How long it is. The default is -1.
    :param headers: Multipart headers as a `werkzeug.Headers`. The default is
                    `None`.
    """

    def __init__(
        self,
        stream=None,
        filename=None,
        name=None,
        content_type="application/octet-stream",
        content_length=-1,
        headers=None,
    ):
        FileStorage.__init__(
            self,
            stream,
            filename,
            name=name,
            content_type=content_type,
            content_length=content_length,
            headers=None,
        )
        self.saved = None

    def save(self, dst, buffer_size=16384):
        """
        This marks the file as saved by setting the `saved` attribute to the
        name of the file it was saved to.

        :param dst: The file to save to.
        :param buffer_size: Ignored.
        """
        if isinstance(dst, string_types):
            self.saved = dst
        else:
            self.saved = dst.name
그 아래에 flask_uploads.py 를 만든 다음 위의 내용을 넣습니다.

backend/api/__init__.py 에서 위와 같이 import 경로를 수정하고,

backend/api/utils/image_upload.py 에서도,

backend/api/resources/image.py 에서도 import 경로를 수정해줍니다.

그리고, Flask-Uploads 패키지는 필요가 없으므로 지워 버리겠습니다. ( requirements/common.txt)

이후 backend/requirements.txt 를 하나 만든 다음,

내용은 prod.txt 를 따라 설치하도록 작성합니다!
이제 찐최종으로 배포할 준비가 되었습니다. 다음에는, Dockerize를 수행하며 “무수한 삽질” 을 경험해볼 겁니다. :)

